The Battle of Neville’s Cross, 1346

Battle of Neville’s Cross from 15th Century Manuscript – https://gallica.bnf.fr/ark:/12148/btv1b84386043/f218.image#

In 1328, Charles IV King of France died without issue.  Charles’ closest blood relative was his sister, Isabella.  But, as Salic Law disallowed female succession his closest male relative was Isabella’s son, Edward III, King of England.  Isabella claimed the throne of France on her son’s behalf but, perhaps unsurprisingly, the French stoutly rejected this notion and backed Charles’ patrilineal cousin, Phillip, Count of Valois.  Since the time of William the Conqueror English Kings had held substantial lands on the continent.  At its height at the end of the 12th Century, the Angevin Empire included Normandy, Maine, Anjou, Touraine and Aquitaine, and occupied a geographically larger area than that of the Kingdom of France.  However, the English Kings did homage for these lands recognising the King of France as their ultimate sovereign lord.  The extent of the English lands had been the cause of much friction between England and France for most of the Middle Ages.  The French continually sought to check English power and stripped away their lands whenever the opportunity arose, most often when the English were at war with Scotland and could not retaliate.  By 1337, only Gascony was in English hands.  Edwards attempts at upholding his claim to the French throne were only ever lukewarm.  However, in May 1337 a Great Council was held in Paris and it was decided that Gascony should be returned to the French Crown, using a shaky pretence that Edward had been harbouring an enemy of the French King.  Emboldened by his victory against the Scots in 1333 and enraged by the threat of losing his remaining continental possessions, Edward renewed his claim to the French throne, with the resolve to use force of arms to get the crown.  This was the start of what is known to history as The Hundred Years War.

An initial “phoney war” ensued in the beginning with political manoeuvring and raids on mercantile trade.  The first serious action was a naval action where the English decisively defeated the French navy at the Battle of Sluys in June 1340.  A proxy conflict then followed over the succession for the Duchy of Brittany with Edward supporting John de Montfort and Philip backing Charles of Blois.  Eventually, in 1346, the English backed horse won which gave Edward a useful ally.  Seizing his chance Edward launched an all-out invasion in July 1346.  After being caught off guard by the speed and ferocity of the English onslaught the French regrouped and mustered a huge army to check their advance.  On 26th August the two armies met at Crecy.  Although greatly outnumbered the proven tactics of the English, using dismounted men-at-arms and the deadly longbow, destroyed the French army.

Prior to the Battle of Crecy, Philip had written to his ally King David II of Scotland, imploring him to open a second front and invade England from the north.  Under the terms of the Auld Alliance David dutifully obliged.  Although convinced that northern England would be a “defenceless void”, as described by King Philip, David found stiff local resistance to his incursions.  David agreed a truce until September, using the time to muster a more substantial force to invade. 

ON the 7th October the Scots invaded via Cumbria with around 12,000 men, which included a small number of French soldiers, and a lot of modern equipment and weapons supplied by France.  Their first target was the small border fort of Liddell Peel, which held out for three days before the garrison was overwhelmed and slaughtered.  The army spared Carlisle but only because and extortionate sum of money was paid to save their skins.  Marching East, the Scots then spent three days looting Hexham Abbey before advancing on towards Durham.  The Scots arrived on 16th October and made camp at Beaurepaire Priory, located to the West of Durham on the banks of the River Browney.  The monks paid the Scots £1,000 as protection money so they would not receive the same fate as Hexham.

River Browney – John Morton (c)

A Note on Beaurepaire

Beaurepaire Ruins – John Morton (c)

In around 1248, Bertram de Middleton, Prior of Durham wanted to build a summer residence for his brethren.  He explored the land far and near and at last came to the decision that the grassy heights about three miles north west of Durham overlooking the lovely valley of the winding River Browney, was the exact spot for fulfilling his purpose.  The name, “Beaurepaire”, meaning beautiful retreat was corrupted over the years to Bear Park, which is where the modern settlement gets its name.  The structure is now in ruins and not much can be seen although it has recently received some well needed attention and is being lovingly maintained by groups of volunteers led by Dream Heritage (http://dreamheritage.co.uk/).  They have done an amazing job clearing the site and making it accessible for visitors.  A description of the manor house is provided in the Monthly Chronicle of North-country Lore and Legend Volume 5 (1891):

“The chapel is 13 paces long, and eight wide; the east window consists of three lights, circular at the top and very plain; there are three windows on each side, each divided by a mullion into two lights, their framing on the inside square. The wall is strengthened by a buttress of neat hewn stonework between each window, and a cornice runs round the building of the zig-zag figure. There is a door on the north side of the chapel from the court. The walls of the chapel on the inside are ornamented with a regular succession of small round columns or pilasters, belted in the midst, the capitals filled with a garland of open-cut foliage of delicate work, from whence spring pointed arches; three pilasters and two arches in each space between the windows; the west end is equally finished with pilasters and arches, and there is a small window in the centre. At each side of the east windows is a pedestal for a statue of considerable size. The apartment under the chapel is lighted by small square windows; but as the floor of the chapel is gone, it is not easy to determine how it was at first constructed. Adjoining to the chapel, to the west, is a long. building, the two gables of which are standing, having a large window of six lights to the south; this was most probably the refectory. On the north, the remains of a building, 20 paces in length, lighted to the east by three windows, which we conjecture was the dormitory. There is a door case standing, which has been the entrance into the garden or some chief court, with the arms of the See in the centre.”

Beaurepaire Ruins – John Morton (c)

Despite Edward’s focus on his invasion of France, defence of the north had not been forgotten.  Indeed, when mustering his army to invade France Edward had sensibly not asked counties north of the Humber to provide men.  An attack from the north had been expected for at least two years and once the Scots crossed the border an army was quickly raised in Richmond, North Yorkshire, under the command of William de la Zouch, the Archbishop of York and Lord Warden of the Marches.  Moving north, the army was reinforced on route with men from Yorkshire, Northumberland, Cumberland and Lancashire.  Reaching Barnard Castle, command of the combined force of some 6,000 to 7,000 men was handed to Ralph Neville, 2nd Baron Neville of Raby Castle.  The force then quickly marched north to face the Scots.     

On the route from Beaurepaire to Neville’s Cross – John Morton (c)

On the morning of the 17th of October, a small Scottish force of some 500 men rode out from Beaurepaire to raid the lands to the south of Durham near Merrington.  There, in the morning fog, they came upon the English army as they marched north from Ferrybridge.  A fierce fight ensued with the English rear guard mauling the Scots leaving around 300 Scottish dead and chasing them as far as Sunderland Bridge.  The commander of the Scottish force, Sir William Douglas of Liddersdale, spurred his horse back to camp to warn King David that the English were almost upon them, and battle was at hand.  David gathered his army and led them to high ground to the west of Durham where he arrayed his men in their traditional shiltron formations.  The formations were strengthened by men-at-arms and light horsemen on the flanks, riding sturdy mounts called hobelars.  The Scots also had archers who were employed to skirmish with the English as they advanced.  John Randolph, Earl of Moray commanded the first battle, King David the second and Patrick Dunbar, Earl of March the third. 

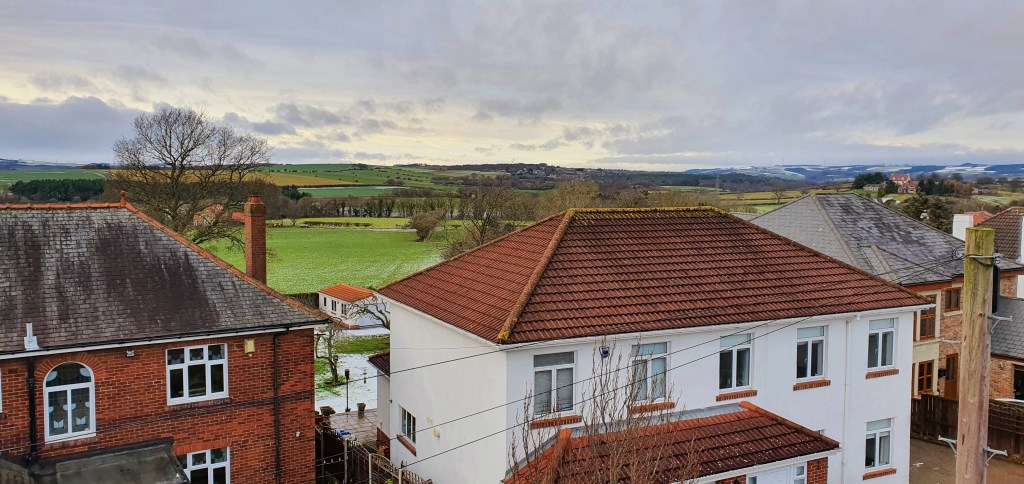
View from the A167 foot bridge looking west towards the battlefield beyond the houses – John Morton (c)

Although outnumbered the English mirrored the Scots formations and drew up in three battles of their own to face them.  The English commanders were Lord Henry Percy in command of the first battle, Ralph Neville the second and Sir Thomas Rokeby and the Archbishop of York the third.  The English arrayed themselves with men-at-arms in the centre and archers on the flanks and a small body of cavalry in reserve.  Neville had halted his men in a defensible position and as the fog began to lift it became apparent that the Scots had chosen a poor position with obstacles and broken ground between them and the English. 

The English received calls for divine intervention from the brethren of Durham Cathedral and were even provided with the Banner of St. Cuthbert (which had proven useful in battle before).  The following passage from the Monthly Chronicle of North-country Lore and Legend Volume 1 (1887) describes what the spiritual soldiers did.

Engraving of Neville’s Cross in the 18th Century – Monthly Chronicle of North-country Lore and Legend

Issue was joined not far from the spot where the remains of Neville’s Cross now stands. On that spot was planted the standard of the English host. In compliance with the nocturnal suggestions of their patron saint, who seems to have had an uneasy time of it whenever his beloved city was threatened, the monks of Durham extemporised a standard by fastening to a spear handle the holy cloth (the corporal or corporax) wherewith St. Cuthbert, in the days of his fleshly ministry, was wont to protect the chalice in the eucharistic service. Some of these holy brethren were stout-hearted warriors in their way, and possibly a picked band of them may have shouldered a lance or a battle axe under the command of their noble diocesan; but the bulk of them betook themselves to those spiritual weapons which better beseemed their sacred calling. They ascended the central tower of their magnificent shrine, from the summit of which they could command an excellent view of the greater portion of both armies; and from their sublime watch-tower they chanted their misereres and their songs of triumphal praise according as the tide of victory ebbed or flowed. But the sound of their psalmody was lost in the din of battle.

Neville was happy to wait for the Scots to make the first move so as not to give up his superior position.  He ordered his archers forward to try to provoke the Scots to attack.  This worked.  Against his Kings orders John Graham, the Earl of Menteith, rashly led a cavalry charge and tried and failed to sweep the archers from the field.  The Scottish cavalry withdrew under the hail of arrows exposing the flanks of the spearmen.  Unwilling to stand and take this long range assault the Scots advanced to close with the English.  Hampered by the terrain, fences and hedgerows the Scots found it difficult to maintain their formations all whilst under a storm of arrows.  As the beleaguered Scots got closer the archers retreated behind the men-at-arms.  Moray’s battle led the assault but had lost much of its impetus during its tortuous advance and the English made short work of them when it came to hand-to-hand combat.  The King’s battle had to endure the arrow storm for longer as they had to cover more ground than Moray to engage the English.  When they did close the English men-at-arms attacked with such ferocity that the Scots were unable to retreat in good order and were routed.  It is likely that the third and largest battle under the command of the Earl of March may not have even engaged seeing the carnage being wrought on their fellow countrymen.  A vestige of the carnage wrought that day is captured in the name “red hills” which is given to this part of Durham and was as literal a description as you can get.

King David was defended gallantly and desperately by eighty faithful followers; but either on the battlefield, or shortly after, by the bank of the Browney, or, as one account says, under the bridge which crosses the little river just below the battlefield, he was captured by Sir John Coupland, a Northumbrian squire, who lost his front teeth from a blow of the royal mailed fist, and gained both honour and riches as a reward for his prowess and luck in effecting the capture, he being knighted and presently made Governor of Berwick. Several great noblemen shared the King's fate of captivity. Among them, the Earls of Fife and Menteith; while a far greater number bit the dust in the agonies of death on that fatal day. The actual battle lasted only from nine a.m. till noon. 
When it was all over, the conquerors repaired in triumph to the Cathedral to pay their vows for the succour of the mighty saint beneath whose holy banner they had fought. They had lost comparatively few of the rank and file, and Lord Hastings was the only noble who perished on the field. Lord Neville, at a later period, received a grateful tribute from the exclusive guardians of the Cathedral, for he was the first layman whose bones were permitted to rest within the holy pile. The tradition is that his lordship at his own cost erected a magnificent cross on the spot where the corporax or chalice cover affixed to a spear had served as the standard for the English forces. There is, however, reason to suppose that it was a cross station at the time of its selection as the place for the holy standard, though probably it was not known as Neville's Cross till the victorious lord had put up a memorial of the great fight with King David on Crossgate Moor. The King, it may be mentioned, was released the following year on a ransom of 100,000 marks, and it may be further remarked that this ransom is owing to the English Exchequer even unto this day.
 
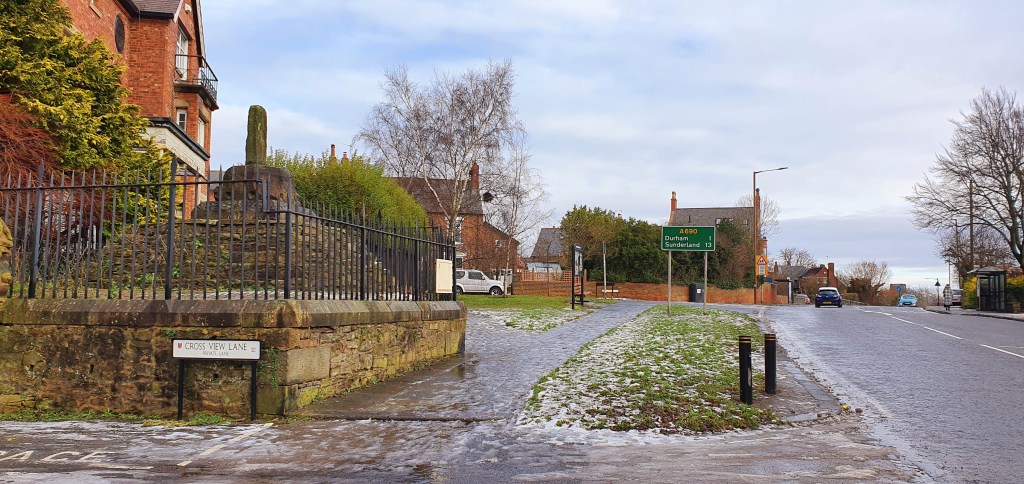
Neville’s Cross today – John Morton (c)
The cross which Lord Neville set up on the site of the battle was an elaborately carved structure. It was, however, one night in 1589, broken down and defaced by "some lewd, contemptuous, and wicked persons," probably Puritans of the period. All that remains of it now is an octagonal stone, the pillar affixed to which, as shown in our view, is no part of the original cross, but appears to have been placed there in more modern times, most likely in the early part of last century. 
The landscape has inevitably changed considerably since 1346, however, you can do a really nice walk along the banks of the River Browney and up to the ruins of Beaurepair.  The lay of the land is such that with a bit of imagination you can piece events together.  There are some really good, if a little faded, information boards on the pedestrian bridge over the A167 near St. Bede’s Close and just off the main road.  The view from the bridge gives a great vantage point.  Neville’s Cross itself, or what remains of it, can still be seen in a little fenced off area just to the side of A690 as you approach the crossroads from Durham.  This too has an information board to read.  I’m glad to say that it has recently been refurbished and is a good starting point to walk the battlefield.
It should be noted that the Registered Battlefield area is currently under review with recent evidence suggesting that the battle may have been fought further to the north.
Historic England Registered Battlefield Area for Neville’s Cross

The Battle of Halidon Hill, 1333

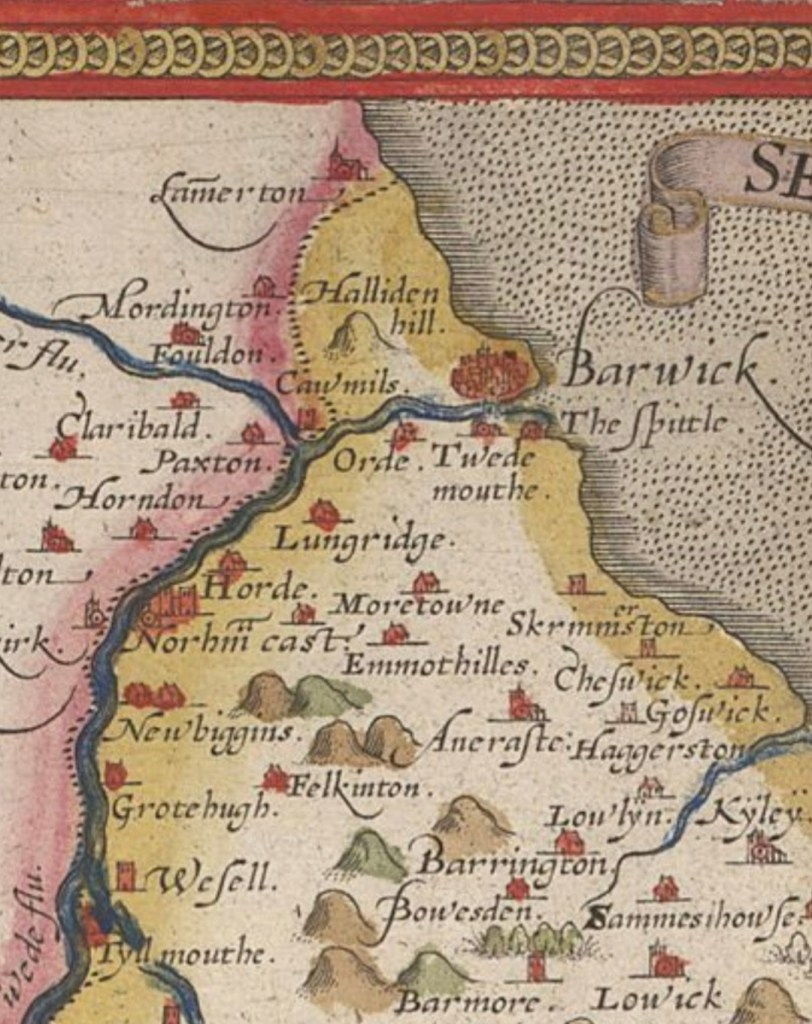
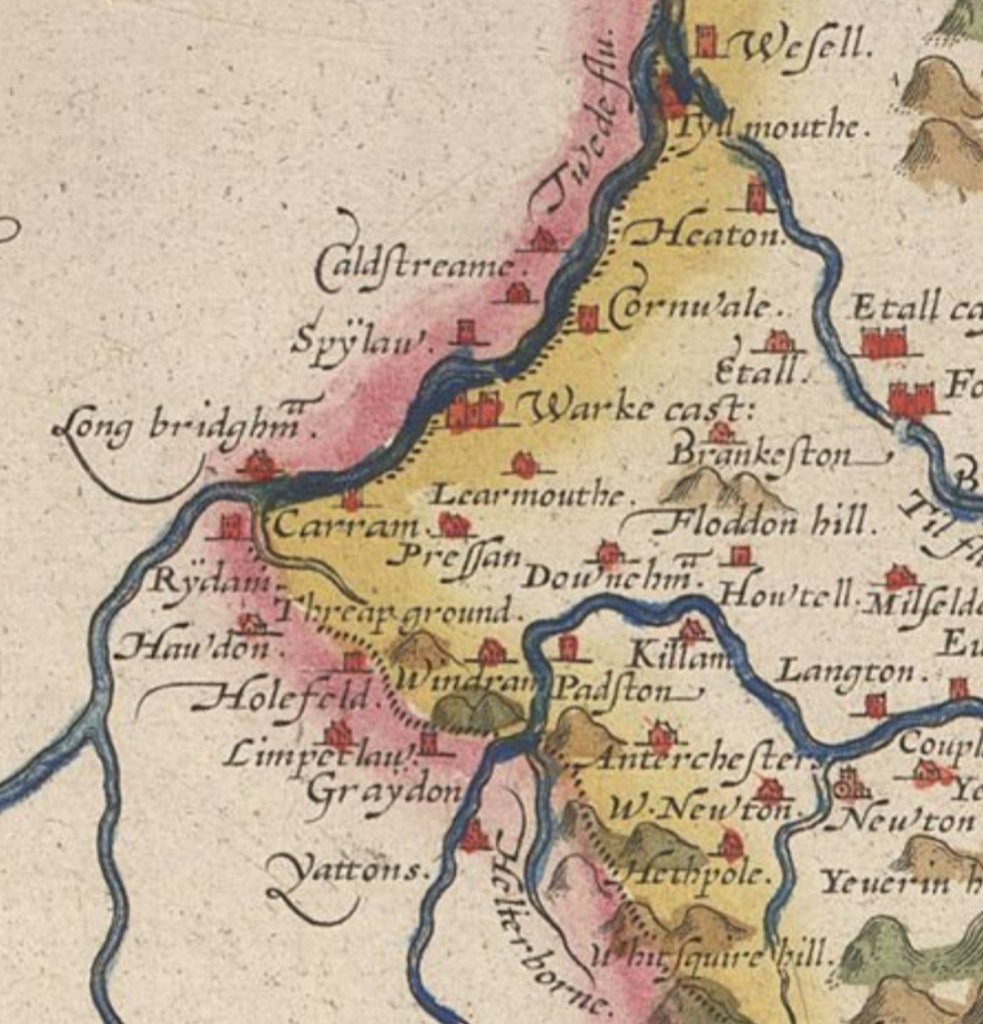
Saxton Atlas showing “Hallidon Hill” (c) oldmapsonline.org

Following the humiliation of the English during the Weardale Campaign the young King of England, Edward III was forced to sign the treaty of Edinburgh – Northampton in 1328.  The terms of the treaty were, that in exchange for £100,000 the English crown would recognise that the Kingdom of Scotland was fully independent, that Robert the Bruce and his successors were the rightful rulers of Scotland and that the border of Scotland should be maintained as agreed in the Treaty of York signed between Alexander II of Scotland and Henry III of England in 1237.  The First War of Scottish Independence was over, seemingly with Scotland’s aspirations realised. 

Coronation of Edward III (c) Historic-uk.com

This did nothing for the young English King’s popularity, which was already laid low due to the malign influence of his mother, Isabella, the “She Wolf of France” and her lover Roger Mortimer.  The treaty was widely referred to in England as the turpis pax or “coward’s peace” and Edward was perceived as weak and ineffectual.  Tensions grew as Edward reached his majority, married and had his first son.  By 1330 Edward had had enough.  He now needed to exert his own influence and power.  With a band of trusted men, he surprised Mortimer at Nottingham Castle, arrested him and sentenced him to death.  He was more lenient with his mother, forcing her in to comfortable “retirement”.  It was from this moment that Edward III’s personal rule began.

A year before Mortimer was executed, in 1329, the Scottish independence movement was dealt a serious blow when the indomitable Robert the Bruce died at the age of 54.  He was succeeded by his son, David II, who was only five years old.  As had been shown in the past and recently in England a minority reign was a dangerous time. It was decided by the Bruce, on his death bed, that during his minority Scotland should be governed in his name by his nephew, Sir Thomas Randolph, 1st Earl of Moray.  His stewardship did not last long and three years later on 20th July 1332 Thomas died whilst mustering troops to counter an incursion by Edward Balliol and his supporters.  Some thought he had been poisoned by the English, but it is more likely that a kidney stone was the killer.  The stewardship of the Scottish throne passed to Domhanall II, Earl of Mar after being elected by the Scottish nobles on 2nd August 1332.

Seal of Edward Balliol

The aforementioned incursion of Edward Balliol in the summer of 1332 requires further elaboration.  Balliol, the son of King John I of Scotland (1292 – 1296), had been captured by the English following his father’s resignation of the throne in 1296.  He was initially held in the Tower of London, then in 1299 was handed over to his grandfather, John de Warenne, 6th Earl of Surrey. 

Following the death of Robert the Bruce, and the precarious state of the minority rule in Scotland, a number of Scottish nobles who had not sworn fealty to the Bruce following his victory at the Battle of Bannockburn sort to back Baliol in a plot to take the throne.  Living in exile these nobles, “the Disinherited”, made plans for the invasion of Scotland with English troops.  Edward III was aware of this scheming and although, in accordance with the terms of the Treaty of Northampton, he outwardly proclaimed that anyone plotting to break the peace would be arrested, but he tacitly supported the venture behind closed doors.  Whilst he could not condone an incursion of English forces crossing the border he could and did turn a blind eye to an English force departing by sea from ports in Yorkshire. 

Dupplin Moor Campaign

Under the command of Balliol and Henry Beaumont, Earl of Buchanan the Disinherited mustered a small force of some 1,500 men of which around two thirds were longbowmen and made sail for the Fife coast on 31st July.  As mentioned previously, the Scots were well aware of this plot and the Earl of Moray had died on his way to counter the threat.  His successor the Earl of Mar took up the mantle and mustered a large body of men to meet Balliol’s landing.  The invasion force landed near Kinghorn in Fife on 6th August 1332.  They were confronted soon after and a skirmish ensued as they disembarked.  In a prelude to many battles to come the small contingent of English longbowmen, who had gotten ashore first, drove off the attack by the superior numbers of Scots.  The Brut Chronicle describes that the retreat was “full of shame” due to the Scots retreat before a smaller force.  Mar drew back to Perth and rallied the survivors whilst Balliol marched on Dunfermline.

Heading north, the Disinherited reached the River Earn (2 miles to the south of Perth) where the reconstituted Scottish army were waiting for them at Dupplin Moor.  Outnumbering Balliol’s force by as much as ten to one the Scots had broken the only bridge over the Earn and waited on the opposite bank.  So sure, of their impending victory, the Scots spent the night feasting and making merry in to the small hours.  They had forgotten The Bruce’s sage advice that the Scots should never face the English in open battle.  The following morning, although disheartened at the size of the enemy host, Balliol’s army prepared to attack.  As they moved forward the Scottish army began to advance in two huge schiltron’s, one commanded by Mar and the other by Robert the Bruce’s illegitimate son, the Lord of Liddesdale, also named Robert Bruce. 

The English army arrayed itself with dismounted infantry in the centre and archers on the wings.  The Scottish schiltron’s vied with each other to be the first into combat with the result of disorganising their formations.  The battlefield was a valley girded by hills and Scots advance was funnelled into the English centre.  Bruce’s men reached the English first and drove them back but they did not break, all the while under a constant and murderous hail of English arrows.  Mar’s schiltron crashed into the rear of the first and the battle turned into a confused mele all under the constant hail of arrows.  It is likely that more Scots died from being suffocated and trampled by their own men than were slain by the English.  The battle turned into a massacre and by sunset both Scottish commanders had been slain.  The remaining Scots routed and were pursued by the now mounted English infantry well into the night.  Thousands of Scots had died including much of the nobility at the cost of very few English.  Balliol, victorious, marched to Perth and had himself crowned King of Scotland at Scone on 24th September 1332.  In two public letters Balliol declared that he had reclaimed his kingdom with the help of England and that he acknowledged that Scotland had always been a fief of England.  He also promised to hand over border lands, including Berwick upon Tween to Edward III, and that he would serve the English king for the rest of his life.

Sufficed to say Balliol’s declarations incensed the majority of Scots and his reign was immediately challenged by those nobles still loyal to the boy King David II.  On the 7th October 1332 David’s supporters recaptured Perth and destroyed its defences.  Less than three months after his coronation on 16th December Balliol was ambushed by a force lead by Sir Archibald Douglas (the new Guardian of Scotland following the death of the Earl of Mar), John Randolph, 3rd Earl of Moray, Robert Stewart and Simon Frazer.  Known as the Battle of Annan, most of Balliol’s men were killed and Edward himself was put to flight escaping by the skin of his teeth and as legend has it riding, naked to Carlisle.  After finding some suitable attire, presumably, Balliol went directly to Edward III to appeal for his help.  Edward, keen to gain the initiative in Scotland and demonstrate his increasing power recognised Balliol as the legitimate King of Scotland and dropped any pretence of neutrality.  England prepared for war.

Berwick Under Siege

Berwick upon Tweed was the chosen target of the English attack.  Edward hoped to capture the town, which was a populous a wealthy port, and considered to be the “gateway to Scotland”.  Such was its value that he was sure that it would draw the Scots into a pitched battle to recapture it.  His experience of the frustrations of the Weardale Campaign were still fresh in his mind and he wanted to avoid that game of cat and mouse at all costs and defeat the Scots decisively.

Part of 16th Century Map of Berwick showing the medieval fortifications (c)oldmapsonline.org

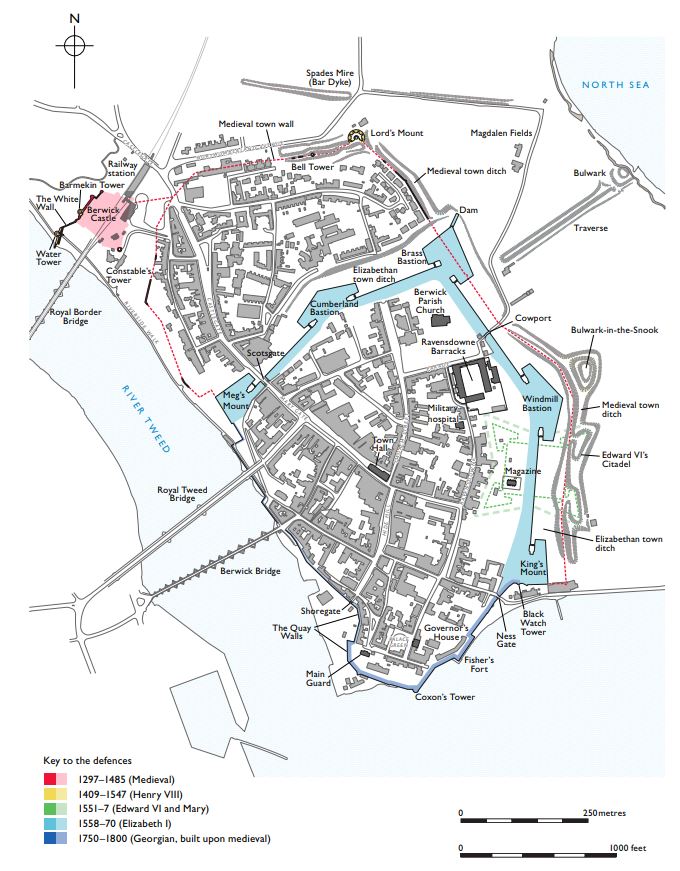
Berwick was a heavily fortified town with encircling walls (not to be confused with the impressive Elizabethan fortifications you can see today), strong towers and gatehouses.  Berwick Castle was situated in the north-western corner of the town.  Construction of the castle was probably begun by the Scottish King David I early in the 1100’s.  It was an impressively strong fortress with walls up to 50 feet high and 12 feet thick.  It is sat on a rocky outcrop with steep valleys either side where it commanded approaches from the River Tweed.


Berwick Defences (c) English Heritage

Balliol led an expeditionary English force by land and crossed the border on 10th March 1333 arriving at Berwick by the end of that month and laid siege to the town.  Edward had blockaded the port by sea and arrived at Berwick with the main English army on 9th May.  The surrounding lands were ruthlessly pillaged and all supplies to the town were cut off.  The English busied themselves building siege equipment and bombarding the town with two large trebuchets.

At this point it is worth discussing the role of one John Crabbe.  Crabbe was a Flemish merchant, pirate and soldier.  He had spent much time raiding English shipping and based himself for some time in Aberdeen where he received a warm welcome from the Scots.  After achieving considerable notoriety Crabbe eventually came to settle in Berwick where he became a burgess.  He went on to play an important role in the defence of the town during the siege on 1318-19, being given credit for designing a weapon to which dropped stones on to the English who were trying to undermine the castle walls.  During the Dupplin Moor campaign, Crabbe lead a fleet of Flemish ships, but they were decisively defeated by an English fleet in the Firth of Tay.  After that skirmish, Crabbe escaped back to Berwick but was not long after captured by an English soldier called Walter de Manny.  Manny received a ransom of some 4,300 marks from the Scots for Crabbe’s release, however, Edward III would have none of that.  He was kept in chains until he had made restitution for his earlier piratical activities, and it seems he was coerced into assisting the English at the Siege of Berwick in 1333.  The Scot’s, enraged by this apparent betrayal (which is a little unfair to Crabbe since he probably had little choice in the matter), had Crabbe’s son killed and refused to pay any further ransom to get him back.  Edward III would co on to pardon Crabbe for his good service during the siege and made him constable of Somerton Castle in Lincolnshire.

The Scots knew of Edwards plans in advance of their invasion and Sir Archibald Douglas had assembled a large Scottish army to face the threat.  By the end of June the Scottish garrison of Berwick was close to surrender.  The town’s governor, Sir Alexander Seton, requested a truce with Edward on the condition that he would surrender the town if not relieved by 11th July.  Edward demanded that hostages were provided to seal the bargain and Seton dutifully offered his son Thomas along with 11 others. 

Weighing up the considerable risks he was contending with Douglas crossed the border on the day that the truce was due to expire.  With an army numbering as many as 15,000 men (contemporary chronicles have numbers up to 100,000) he advanced to Tweedmouth, which the English were using as their supply port, and burnt it to the ground in sight of the English army.  The English did not rise to this antagonization and held firm in their entrenchments.  On 12th of July a small force of around 200 Scottish cavalry, commanded by Sir William Keith, headed towards Berwick, and with much difficulty made it into the besieged town.  Keith then took on the Seton’s role as governor.  Douglas claimed that, because of this, the town had been relieved, and that Edward should depart threatening to invade England if he did not.  Edward ignored this threat and considered that the town had not been relieved and therefore the truce had been broken.  Despite the entreaties of his wife, Seton and Keith did not surrender and Edward, henceforth, erected a gallows outside the town walls at Tweedmouth (at a spot still known as a “Hangie Dyke Neuk”) and executed Seton’s son Thomas in front of his parents. 

“The trumpets sounded out oure the Tweed

               Wi’ a blast o’ deadly sound;

Auld Seaton and wife gaed up on the wa’s,

               For theyre sonnes to death were bound.”

Extract from the Ballad of Seton’s Sons, or the Beleaguering of Berwicke, from Sheldon’s Minstrelsy of the English Border

A proclamation was made that for every day that the town did not surrender a further two hostages would be hanged.

Following the execution of Thomas Seton, a new truce was agreed on the condition that if the garrison was not relieved by 19th July the town would be surrendered and all inhabitants would be granted safe passage.  This time, what constituted relief of the town was very clearly defined; either the entrance of 200 or more Scottish men-at-arms into the town, the Scottish army forcing its way across a specific stretch of the River Tweed or a defeat of the English army in open battle.

The River Tweed west of Berwick (c) John Morton

On his way north to Scotland Edward had bought his wife, Queen Phillippa with him as far as Bamburgh Castle, where she stayed.  Seeing the opportunity to draw Edward away Douglas marched his army south into Northumberland to attack the queen.  This ruse had been used before.  In 1319, when Edward’s father, Edward II had laid siege to Berwick the Scots had marched south to York where Edward’s mother had been ensconced.  Back then it had resulted in the desired effect and Edward II had lifted the siege to go ensure his wife’s safety (I’m not sure if he regretted that later in life!).  This time, however, Edward III did not take the bait.  Bamburgh was a strong fortress and Edward knew that Douglas did not have the time or resources to storm it.  Douglas laid waste to the surrounding land but still Edward remained steadfastly at Berwick.  All of his subterfuges exhausted Douglas felt his only option was to fight Edward in battle.

The Battle of Halidon Hill

Battlefield Deployments (c) The Battlefield Trust

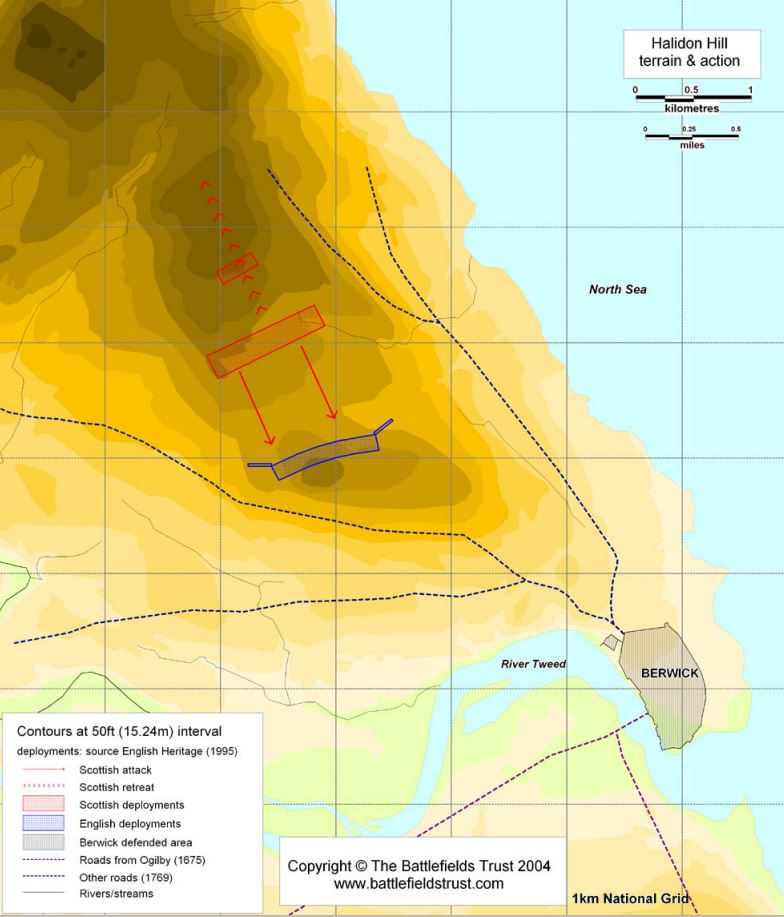
Edward manoeuvred the bulk of his army of some 10,000 men to Halidon Hill, around 2 miles from Berwick, leaving around 700 men to guard the siege perimeter and prevent a sally from the town.  Halidon Hill was a strong position and offered a superb vantage of the surrounding land.  The Scottish army marched back north from Northumberland, reaching the town of Duns (approximately 12 miles to the west of Berwick) on 19th July.  The following day they advanced on the English position from the northwest.  This put the English army between the Scots to the north and the River Tweed to the south. An English defeat would have been disastrous with no easy route of retreat, and Edward knew it.  He turned his army to face the Scottish advance and formed up in to three blocks of infantry or “battles”, covering a wide arc.  The now feared longbowmen were positioned on the wings of the infantry.  The Scots halted on a nearby hill to the northwest and formed a defensive position.  A lower lying boggy area separated the two hosts.  The Scots expected the English to attack, but they held firm.  The armies were close enough to trade insults and at one point the Scots challenged the English to send forth their champion to engage in single combat.  Robert Benhale of Norfolk dutifully accepted the challenge and fought a Scottish champion called Turnbull and his dog.  Benhale killed them both.

Terrain Plan (c) The Battlefield Trust

The stalemate continued with neither side engaging even though the Scots had numerical superiority.  Perhaps they were waiting for high tide in the Tweed to ensure that retreat for the English would be near impossible.  However, Douglas knew that delay or retreat from battle would ensure that fall of Berwick and ultimately, he was compelled to make the first move.  The Scots needed to advance down hill and across a boggy low lying area before they could climb the slope up to the waiting English. A little afternoon horn and war pipes sounded, and the Scots charged.  Remembering the murderous effect of the English longbow at Dupplin Moor the Scots tried to counter the barrage by running as fast as they could through the “kill zone”.  Hampered by boggy ground, the arrows fell on the tightly packed Scottish schiltrons “as thick as motes in a sun beam”, according to an unnamed chronicler.  The Scots were exhausted by the previous days march and the rapid advance and intense arrow storm coupled with the strength of the English position took out most of the impetuous from the Scottish charge.  The schiltron under the command of the Earl of Mar engaged with Balliol’s battle first, who held their ground.  A second schiltron engaged with the King’s battle in the centre.  The third schiltron clashed with the battle commanded by Henry Beaumont.  Furious close combat ensued all the while the English archers continued to pour arrows into the flanks and midst of the Scottish formations.  The fighting did not last long and the Scots fighting Balliol broke first.  As with an infectious disease the panic spread and before long the Scottish army was in full route. 

Edward was not in a merciful mood and the English pursued the broken Scots for 8 miles.  Few prisoners were taken and around 100 of those who were taken captive were beheaded the next day on 20th July.  This was the day of the expiration of the revised truce and the garrison at Berwick, having borne witness to the battle, duly surrendered the town.

Modern estimates put the Scottish death toll at c.3,000.  As ever the contemporary accounts vary wildly.  However, by any measure, English deaths were comparatively very few, perhaps less than 20.  Edward got the decisive battlefield victory he had wanted.

Balliol was restored to the throne of Scotland and dutifully began redistributing the lands to the disinherited lords who had helped him.  Unfortunately, this dispossessed a new generation of nobles, the sons of those who had fallen in battle, and they were set on continuing the cause of Scottish Independence in the name of David II.

Visiting the Battlefield Today

Battlefield Walk Information Board

A walking route around the battlefield is accessed just off the A6105 (Duns Road).  Post Code TD15 1UD takes you to a small car park and there are information boards which show you the routes of the walk.  On a good day you will be provided with some breath taking views of the border country and will fully appreciate Edward III’s reasoning for choosing this site to give battle.  A concrete triangulation point, and wooden bench mark the summit of Halidon Hill.

Halidon Hill Summit looking North West (c) John Morton

The landscape has changed following the Enclosure Act of the mid-19th Century, but I think you still get a sense from the lay of the land and with a little imagination you can certainly feel closer to the events of 1333.

View of Berwick from Halidon Hill (c) John Morton

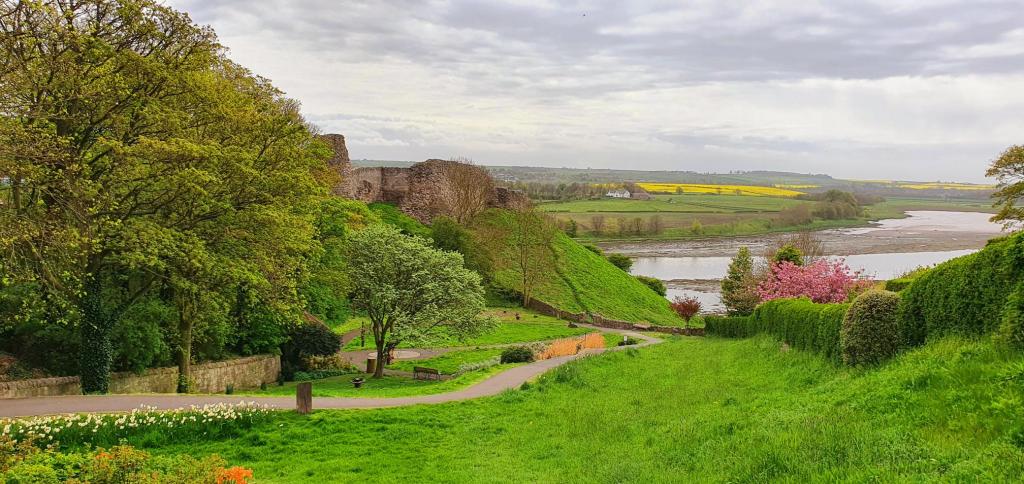
The medieval defences of Berwick are largely lost and, in the name of Victorian progress, unfortunately much of what remained of Berwick Castle was demolished in the mid-19th Century to make way for Berwick railway station and the now iconic Royal Border Bridge.  Remains of the eastern ramparts and the White Wall can be seen in some splendour from Coronation Park.  It’s worth a walk through the park and down to the banks of the Tweed where you can inspect the ruins and marvel at what must have been an impressive fortress in 1333.

Berwick Castle today from the West (c) John Morton
Berwick Castle Walls (c) John Morton
The White Wall, Berwick Castle (c) John Morton
Coronation Park, Berwick (c) John Morton

Sources and Further Reading

In writing this blog I have read older and more modern accounts / interpretations of the events as well as referring to some of the source material.  The books I would recommend are:

  • Scalachronica 1272 – 1363, Sir Thomas Gray (Edited and translated by Andy King)
  • Border Battles and Battlefields, James Robson (1897).
  • Borderland Castles and Peles, Robert Hugil.
  • Border Fury – England and Scotland at War 1296 – 1568, John Sadler (2005).
  • English Heritage Battlefield Report: Halidon Hill 1333 (1995).
  • War Cruel and Sharp – English Strategy under Edward III 1327 – 1360, Clifford J. Rogers (2000).
  • Kings in the North – The House of Percy in British History, Alexander Rose (2002).

Battle of Stanhope Park – 1327

Following his release from captivity, William the Lion returned to Scotland with his kingdom heavily burdened by the cost of his freedom.  The humiliation of the Treaty of Falaise (see my last blog – https://northeastlore.com/2021/01/30/the-second-battle-of-alnwick-1174/) triggered a number of revolts against his rule and he would spend much of his reign concentrating on bringing his own kingdom to heel.  The terms of the Treaty were ended after fifteen years, when the next English king, Richard the Lionheart, agreed to relinquish the Scottish castles taken and end the taxation which he enforced that paid for the soldiers to garrison them.  In return Richard sought a one off payment of 10,000 silver marks, to support his involvement in the Third Crusade. 

Scotland’s independence was restored.  In 1194, William made an offer to purchase Northumbria from Richard, but this was rejected.  Following Richard’s death in 1199, William paid homage to his successor, King John, in 1200.  The English continued to exert their dominance over Scotland however and John marched a large army to Norham on the Scottish border in 1209.  This was purely a show of force with the intention of exacting money from the now aging William and also strongly proposing a marriage agreement between John’s daughter Joan and William’s only son and heir, Alexander.

William the Lion died in 1214 after reigning for 49 years (the second longest reign in Scotland before the Act of Union in 1707).  His son Alexander (II) succeeded him.  In 1215, Alexander joined the cause of the English baron’s rebellion against King John, leading an army south.  After sacking Berwick upon Tweed his army ravaged the north, ultimately reaching the south coast of England.  He even went so far as to pay homage to King Louis VIII of France who had been chosen by the Barons to replace John.  However, John died in 1216, and his son Henry III was proclaimed King before the French could take the throne.  Peace between the three kingdoms was secured in 1217 with the Treaty of Kingston and Alexander returned to Scotland beginning a period of relative peace on the border.  Tensions rose in 1237 when Alexander once more raised the spectre of his hereditary claims to lands in northern England.  The dispute was settled peacefully by the Treaty of York, which defined the border between England and Scotland once and for all.  Other than a brief threat of English invasion in 1243, peace between England and Scotland remained in place for the time being.

Alexander II died in 1249 and was succeeded by his seven year old son, Alexander III.  Two years later, Alexander married Margaret, daughter of Henry III of England (he was ten and Margaret was nine!).  Henry used the marriage as an opportunity to demand that his new son-in-law pay homage for Scotland.  The young Scottish king refused.  His reign marked a time of relative peace and prosperity for Scotland.  He and Margaret had three children.  Their eldest child, a daughter called Margaret after her mother, married King Eric II of Norway.  Their eldest son, Alexander, was raised as heir to the throne and a second son David (the spare) seemed to secure the Royal line.  All seemed set for a smooth succession and a continuation of the stable government which had been enjoyed for some years.  As often happened, however, disaster struck.  Between 1275 and 1284 Alexander III’s wife and all three of their children died. 

Alexander had not re-married following his wife’s death and the next in line to the throne was his young granddaughter, Margaret, the Maid of Norway.  He hastily arranged a marriage for himself to Yolande de Dreux of France, with the express aim of getting a new male heir to succeed him and she indeed duly became pregnant.  Misfortune occurred in March 1286 when, despite being urged not to, he rode through the night, in a storm, to meet his new wife for her birthday.  In the atrocious weather, over treacherous terrain, his horse lost its footing, and the King was killed after being thrown from the saddle.  He died the day before his wife’s birthday.  Possibly in her grief Yolande lost her baby, the unborn heir or heiress, and the succession passed to the seven year old Maid of Norway.  Margaret was never crowned, however.  In 1290, while she was on her way to her new kingdom, her ship sank in a storm.

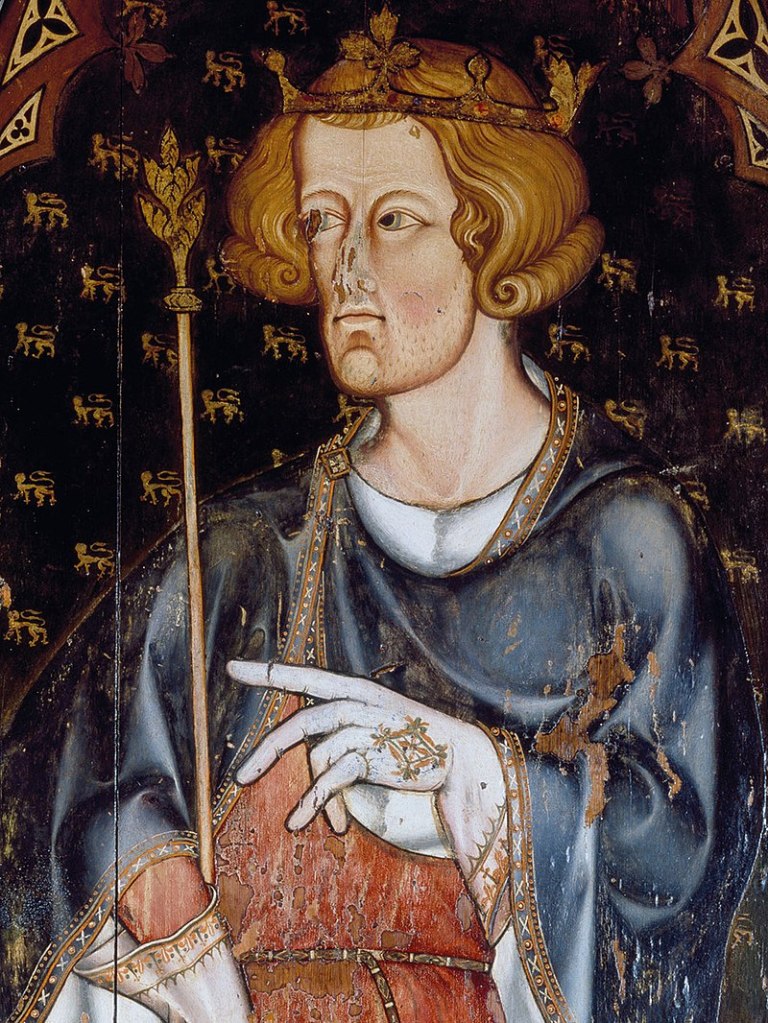
Portrait believed to be of Edward I in Westminster Abbey

At this time, England was ruled by the warrior king, Edward I. Going by the moniker “Longshanks” on account of his height (6’2”), he was ruthless and a master tactician.  Fresh from his success in subduing the Welsh, Edward’s ambitions in Scotland were, to begin with, restricted only to diplomacy.  Following the death of Alexander III, Edward proposed that the new queen, Margaret, should marry his son (the future Edward II).  His long term goal was that this union would eventually bring Scotland under English rule.  Following Margaret’s death, however, Scotland was yet again plunged into a succession crisis.  In the power vacuum, Edward I was asked to arbitrate on the claims of those who thought that they should be the next king of Scotland.  In an unsubtle move to exert his dominance, Edward chose the weak and vacillating John Balliol as the next king.  By 1295 John’s rule was that of a puppet to Edward and it was clear that the English King had designs on conquest.

The Scottish response was to seek a lasting and historically important alliance with England’s enemy, France, the “Auld Alliance”.  In March 1296 Edward I mustered an army of some 25,000 and reaching Berwick upon Tweed he slaughtered almost the entire population of 11,000.  By July, the campaign was over, and Edward declared himself King of Scotland.  He returned to England with the “Stone of Destiny”, the single most potent symbol of Scottish independence.  He also bought with him the dethroned John Balliol to be locked in the Tower of London.  John would be known to history as “Toom Tabard” (meaning empty coat) in reference to him being stripped of his royal vestments.  He was released in 1299 and died in France fourteen years later.  We’ll follow the story of his son, Edward Balliol, in a subsequent blog.

Edward’s invasion of Scotland in 1296 was the start of what is referred to as the First War of Scottish Independence.  English subjugation of Scotland did not go unchallenged for long and in 1297 the country erupted into open revolt.  Andrew de Moray and William Wallace emerged as the principal leaders.  If you have seen the 1995 film Braveheart, you will have been presented with a romanticised semi-historically accurate version of these events.  Multiple insurrections boiled away and when the English raised an army to confront the rebellious Scots it ended at the Battle of Sterling Bridge (the absence of a bridge in the Braveheart depiction of the battle is a constant annoyance whenever I watch that film!).  The Scots were clever, using the terrain and English tactics against their enemy.  It resulted in a resounding Scottish victory which would drive the English out of Scotland.  Damagingly for the Scots, Moray was killed in the battle, but Wallace kept up the momentum and launched an invasion of northern England.  He laid waste to Northumberland and Cumberland with hundreds of refugees seeking shelter behind the walls of Newcastle.  In March 1298, Wallace was knighted and made Guardian of Scotland in the name of the exiled John Balliol. 

Enraged by this ignoble rabble rouser, Edward I made preparations to invade Scotland once more to crush the rebellion.  In July 1298 his army found Wallace near Falkirk.  Although he was a magnetic leader and superb guerrilla fighter, Wallace perhaps lacked the military experience to face the English in the field on his own.  Many sources reckoned on the late Moray having been the master tactician best able to lead to victory the Scots on the battlefield and that Wallace was the popular guerrilla leader.  The subsequent battle ended in defeat for Wallace who was outnumbered (probably two to one) and ‘out-gunned’ by the English longbowmen who decimated his static schiltron formations (a tactic that the Scots would come to fear).  His reputation in tatters, Wallace never recovered.  Wanting to make a particular example of him, Edward I put a lot of energy into hunting him down.  Wallace was finally captured in 1305 and taken to London where he was hung, drawn and quartered as a traitor.

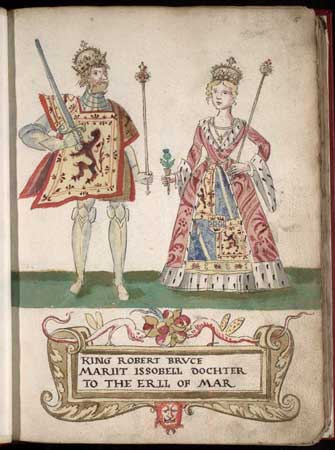
Robert the Bruce and his first wife, Isabella (1562)

As descendants of David I, the Bruce family had some claim to the throne of Scotland after the disaster following the death of Alexander III.  The youngest scion of that house was Robert the Bruce.  He joined the rebellion against Edward I to back up the claim of his father (also Robert) who was Lord of Annandale.  Others noble houses also sought to advance their own claims to kingship.  Following the defeat of Wallace at Falkirk, Robert (known as “the Bruce”) was made Guardian of Scotland in 1298 alongside a rival claimant for the throne, John Comyn and the Bishop of St. Andrews, William Lamberton.  Bruce resigned this post in 1300 due to escalating tension with Comyn and the rumour that John Balliol would soon be restored to the throne.  After a further punitive military expedition in 1303, all the Scottish nobles bent the knee to Edward I.  It seemed as though Edward had succeeded in subjugating his northern neighbour.  One of his well earned soubriquets was Malleus Scotorum or “Hammer of the Scots”.

In 1305, Comyn made a secret agreement with Bruce to forfeit his claim for the throne in return for Bruce’s lands in Scotland, should Robert start a fresh uprising.  In a sly and calculating move, it seems Comyn told Edward I of this meeting – which made Bruce a wanted man.  Bruce arranged to meet with Comyn at the Grayfriars Monastery, Dumfries, in February 1306.  Bruce accused Comyn of treachery and a fight broke out.  Bruce stabbed Comyn before the high alter, and his men finished him off.  Bruce immediately went to Glasgow, where his friend and supporter Bishop Robert Wishart granted him absolution.  Nonetheless, Bruce was excommunicated by the Pope for the heinous crime of killing on consecrated ground (no small matter in the Medieval world).     

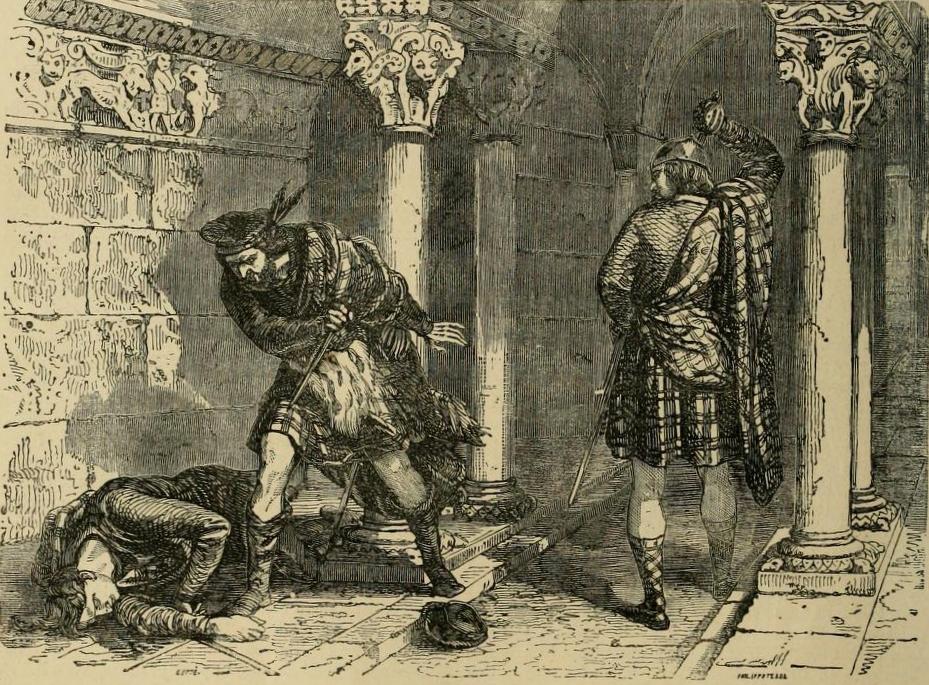
Anachronistic depiction of the death of Comyn by Felix Philippoteaux (19th Century)

Bruce then decided to act on his claim to the Scottish throne.  Six weeks after Comyn was killed, Robert the Bruce was crowned King of Scotland at Scone on Palm Sunday 1306.  Bruce rallied Scottish support and spent the next eights years leading a successful guerrilla campaign against the English.  Scottish fortunes improved when, in July 1307 the aging, yet still fearsome “Hammer of the Scots”, Edward I, died at Burgh by Sands near the Solway Firth.  He was on his way with another army following the English Defeat at Loudoun Hill.  He was succeeded by his son Edward II.  Viewed as a weak shadow of his warrior father, Edward II was not up to the job of quelling the uprising against English rule.  Matters came to a head in 1314 with the crushing defeat of the English at the famous Battle of Bannockburn, fought just south of Sterling.  English losses were huge, with perhaps as many as 700 knights and men-at-arms and 11,000 infantry being killed and with 500 knights and men-at-arms captured.  Scottish losses in comparison were relatively light.  A number of English nobles who were captured were exchanged for Robert’s wife and children as well as the stalwart Bishop Wishart, all of whom had been imprisoned in England.  The defeat of the English left the border undefended and the Scots were able to raid Northumberland and Cumberland unopposed. 

Depiction of the Battle of Bannockburn from the Holkham Bible

In 1320, in response to Bruce’s excommunication, a letter called the Declaration of Arbroath, was sent to the Pope demanding the recognition of a fully independent Scotland.  It also denounced English attempts to subjugate it and sought justification for the right for Scotland to defend itself militarily when unjustly attacked.  The Pope did eventually lift the excommunication placed on Robert and peace talks were held between the warring kingdoms in the early 1320’s.  However, the English still refused to recognise Robert the Bruce as King of Scotland and maintained their claim to the throne of Scotland.  A truce was agreed in 1323 although sporadic clashes would occur.

The remainder of Edward II’s rule was spent dealing with rebellion in England following the elevation of the sycophantic Despenser family and war with France.  In the end, he was deposed and forced to abdicate by his wife Isabella (known to history as the She-Wolf of France) and her lover Roger Mortimer. His young son Edward was crowned on 2nd February 1327 in his place.  It is interesting and somewhat grizzly to read about what may or may not have happened to Edward II.  Some thought he was unfairly treated, and a cult grew up around his legacy with many thinking he should be made a saint.  Edward III was only 14 when he was crowned, and it was clear that Isabella and Mortimer intended to control the young man.  From these difficult beginnings he would grow into one of the most successful medieval kings of England, but that is another story.  The subject of this blog occurred in the very first year of Edward III’s reign and the experience would stay with him for the rest of his life.  What he learned during the 1327 Weardale Campaign likely influenced the military tactics he would employ to such devastating effect against the French and Scottish later in his reign.  

The future Edward III giving homage to Charles IV in 1325 under the guidance of his mother Isabella of France

Due to the perceived weakness of the new boy king on the throne in England and backed up by a renewal of the Auld Alliance with France, Robert the Bruce felt the time was right to resume hostilities and force the recognition of the independence of his kingdom.  In June 1327 a large Scottish army, under the command of James Douglas and the Earls of Mar and Moray crossed the border into Northumberland.  By this time Robert’s health was failing and he did not join his men. 

Isabella and Mortimer had been expecting an attack and had already mustered an army at York to counter the threat.  Edward III was in a precarious position and desperately need to prove himself.  A medieval king held absolute power, but he did so on the proviso that he would be able to defend his people.  Failure to act would give the impression that he was no different from his father, the king who “lost Scotland”.  Accordingly, despite his young age, he led the English army north to meet the Scottish threat head on.   

Scottish raiding tactics of the time involved spreading out over a wide area to loot, burn, murder, and steal cattle (the principal livelihood in the north).  The idea was to cause maximum destruction and maximum terror over huge swathes of land before marching back over the border to count their loot.  The Scots were hardy men and masters of manoeuvrability.  They travelled very light, carrying only their weapons, and living off the land, constantly on the move. 

Froissart, in his Chronicles, tells us:  Since they are sure to find plenty of cattle in the country they pass through, the only things they take with them are a large flat stone places between the saddle and the saddle cloth and a bag of oatmeal strapped behind.  When they have lived so long on half-cooked meat that their stomachs feel weak and hollow, they lay these stones on a fire and, mixing a little of their oatmeal with water, they sprinkle the thin past on the hot stone and make a small cake, rather like a wafer, which they eat to help their digestion.

When an army was sent to stop them, they were able to disperse and melt away, rarely getting drawn into a pitched battle. 

Disparate reports of the Scottish host came in from English scouts but try as they might the English army could not track them down.  The army could see the plumes of smoke taunting them: evidence of the elusive raiders.  As time went by and tensions frayed in the disheartened ranks, it was decided that instead of hunting the Scots down, they would march north to block the Scottish route back north.  The English army camped first at Haydon Bridge and then at Haltwhistle to await the enemy.  More time elapsed with no sign of the Scottish army and the hardship of keeping so many men in the field began to take its toll on the dispirited English army. 

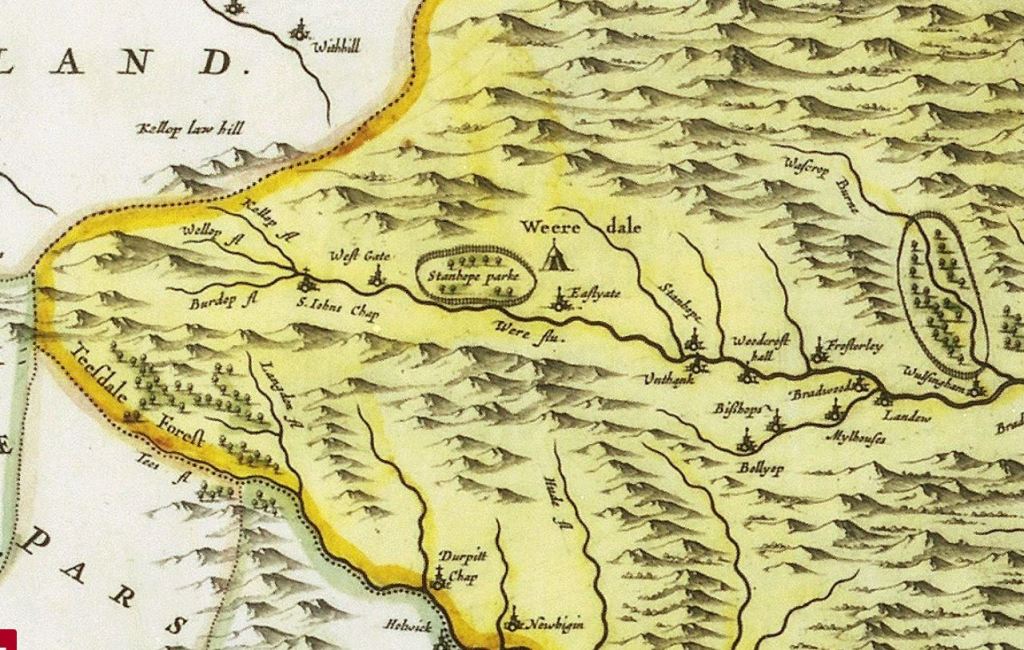
Blau Map 1646 – Showing an enclosed Stanhope Park

Towards the end of July, an English esquire named Thomas Rokesby, who had been scouting, came upon the Scottish host in Weardale near Stanhope Park (at the time Stanhope Park was a hunting reserve of the Bishops of Durham).  It was located just to the west of the modern market town of Stanhope, along the A689 between the villages of East Gate and West Gate – named literally after the gates to the park.  Thomas was captured but allowed to leave with his life on the proviso that he deliver a message to the English king – that the Scots had as much desire to fight and would wait for Edward III to arrive.  The English army marched south.  On their arrival they were horrified to see that the Scots had arrayed themselves in a strong defensive position.  They had formed up into three large schiltron formations on the slope of a hill close to the River Wear.  The English, on the other side of the river, made camp and pondered how they could cross the river and attack without being decimated in the process.  The English knew that swampy ground lay to the north of the Scottish position and reasoned that they were trapped.  With the English blocking their path to the south it effectively would turn into a siege with the English waiting for the Scots to run out of what little supplies they had.  Despite the Scots challenge, they would not give up their formidable position by attacking and a stalemate ensued.

OS 6″ 1888-1913 – Showing the area between Eastgate and Westgate with two “camps” and “fords” shown

The Battle of Stanhope Park refers to an action on the first night that the English made camp.  Sir James Douglas, known as “Black Douglas” was a Scottish knight and lord.  Born in 1286, he had been one of the prominent commanders in the war with England to date and fought with ferocity at Bannockburn.  In 1318 he was instrumental in capturing Berwick back from the English.  On the night of 4th August 1327 Douglas led a group of Scottish men-at-arms in a surprise attack on the sleeping English.  Not expecting such a bold move, panic and confusion ensued and Douglas’s men managed to reach the tent of the 14 year old Edward III himself.  Froissart describes it as follows:  The Lord James Douglas took with him about two hundred men-at-arms, and passed the river far off from the host so that he was not perceived: and suddenly he broke into the English host about midnight crying ‘Douglas!’ ‘Douglas!’ ‘Ye shall all die, thieves of England’; and he slew three hundred men, some in their beds and some scarcely ready; and he stroke his hose with spurs, and came to the King’s tent, always crying ‘Douglas!’, and stroke asunder two or three cords of the King’s tent.  

Thinking that this attack heralded a full scale assault, the English camp made ready, lighting huge bonfires and fortified their position.  The attack never came and after three days the English found that the Scots, under cover of darkness, had managed to pick their way through the swamp to march back home.  Realising they had failed in bringing the Scots to heel, the English army marched back to York.  Sir Thomas Grey in his Scalacronica, states simply the “The King, an innocent, wept”.

The inconclusive campaign was a great setback for the English and the new king.  The Treaty of Northampton, signed in the following year, conceded all the Scottish demands, including the recognition of Robert the Bruce as King of an independent Scotland.  At this price, peace was secured for a few years.

Edward III’s experiences during this campaign must have affected him deeply.  He resolved never to be the victim of circumstance again.  By 1330 he had executed his mother’s lover Roger Mortimer and sent his mother into “retirement” and his personal reign began.

Edward III would go on to have one of the longest and most successful reigns of any medieval English monarch.  Some of the military tactics which he and his son The Black Prince would deploy in the 100 Years War against France (massed archery, fighting on foot and the highlight mobile chevauchee) were developed from his experiences fighting the Scots.  Not content with the peace agreements which had been made in his name (the Treaty of Northampton) Scotland would not know peace for long (of which we will discuss more in the next blog). 

Robert the Bruce died in 1329.  He is, rightly, remembered and revered as one of Scotland’s national heroes.  Despite his victories and the recognition of his Kingdom’s independence, the war with England was not won and his descendants and successors would fight against the English for years to come.  What Robert’s legacy provided more than anything else though, was hope and the pride that victories like Bannockburn instilled into the national conscience.  It reminded the Scots that, whatever the odds, the English could be beaten.

If you are interested in reading more about this subject, then I would very much recommend the following books:

  • Scalacronica, Sir Thomas Grey (edited and translated by Andy King).
  • Chronicles Froissart, (Penguin Classics).
  • War Cruel and Sharp – English Strategy under Edward III 1327 – 1360, Clifford Rogers.
  • Border Fury:  England and Scotland at War 1296-1568, John Sadler.  

The Second Battle of Alnwick – 1174

In my last blog we looked at the First Battle of Alnwick in 1093 (https://northeastlore.com/2021/01/02/the-battle-of-alnwick-1093-rebellion-of-1095/).  It was more of a skirmish than a battle, but it did result in the death of the King of Scotland, Malcolm III and his eldest son and heir Edward.  In this blog we consider the Second Battle of Alnwick.  The same place, another King of Scotland (this time Malcolm III’s great grandson William the Lion), another Scottish defeat, but luckily for William not a cross erected to mark where he died.

It is perhaps helpful to speedily fill in the gaps between events and give broader context to the story.

On the death of Malcolm III and his eldest son a succession crisis ensued in Scotland.  Remember, even after the Scottish victory at Carham, at this time the border between England and Scotland was not yet fixed.  Malcolm III had four younger sons: Duncan, Edgar, Alexander and David, however his brother, Donald, saw his chance to seize the throne.  To be fair to him, primogeniture (the right of succession passing to the eldest son) was not a fixed rule in Scotland, but it was calculated and opportunistic nonetheless. Donald Bane, as he was known, meaning “the fair” was the historical figure behind Shakespeare’s Donalblain in Macbeth.  A year later, the eldest of Malcolm’s boys, Duncan, almost ousted Donald but he was killed in a skirmish.  Donald resumed his reign and ruled for another three years, after which he was succeeded by Malcolm III’s younger sons in sequence: Edgar – 1097 to 1107, Alexander I – 1107 to 1124 and David I – 1124 to 1153.  

For brevity, we’ll skip forward to the youngest son, David.  Before he was crowned, he had become a powerful earl by marriage to Maud, the Countess of Huntingdon, holding lands in England and Scotland as well as being recognised as “Prince of the Cumbrians”.  After a shaky start, David fought aggressively to assert his authority and to expand his Kingdom.  With his eldest son and heir, Henry, he succeeded in pacifying their Kingdom and by the 1030’s they were looking south to England with designs on expanding their territory.

Map showing the extent of the Principality of the Cumbrians

By this time England was on the brink of civil war following the sinking of the White Ship in 1120.  The White Ship sank in the English Channel, not far from the port of Barfleur in Normandy.  It took down with it the only legitimate son and heir of King Henry I of England causing a succession crisis.  The ensuing period of strife following the kings death in 1135, called the Anarchy, pitted Henry I’s daughter Matilda against his nephew Stephen of Blois for the throne of England.  With the help of his brother, the Bishop of Winchester, Stephen had himself crowned king and immediately had to deal with the threat of invasion from the Scots in the north.

Sensing weakness, David I began raiding northern England.  By the end of January 1036 David I’s forces occupied the castles of Carlisle, Wark, Alnwick, Norham and Newcastle.  By February he was at Durham, where he was met by an English army commanded by King Stephen.  Avoiding a pitched battle, the two Kings agreed a treaty whereby David would retain Carlisle, be re-granted the earldom of Huntingdon (which had been confiscated from him) and given the promise that, should the defunct earldom of Northumberland be reinstated, it would go to his son, Henry.  On Stephen’s side, he would take back the other castles which had been taken and received the solemn oath that David would do homage to him for Carlisle and the other English lands David controlled.   

The peace did not last long and in 1138 David lead another invasion into the northern England and the lands controlled by the Bishop of Durham. 

An English army was mustered to meet the Scots and this time a pitched battle was fought in August 1138 at Cowdon Moor near Northallerton in North Yokshire.  The battle is known as the Battle of the Standard, named after the consecrated banners of the minsters of Durham, York, Beverly and Ripon which were flown by the English army.  The battle resulted in a clear defeat of the Scottish army.  However, David regrouped in Carlisle and went on to occupy Cumberland and much of Northumberland.  Peace talks followed at Durham in which David was recognised as ruler of Carlisle and all of Cumberland.  It also resulted in the confirmation of Henry (David’s son) as Earl of Northumberland.  Although defeated in battle this treaty effectively handed David all he wanted to achieve from his invasion.

In 1139 Henry, now Earl of Northumberland, married Ada de Warenne (daughter of the Earl of Surrey) and for a time was present at the English court of King Stephen.  Henry and Ada had seven children, two of whom, Malcolm and William, would go on to become Kings of Scotland.  For the purpose of our story, it is William who we are interested in.

William was born in 1142 at the height of his grandfather, David I’s, reign.  Tragedy struck when William was ten and his father Henry died unexpectedly, although he may have been ill for some time.  William’s elder brother became heir apparent and a year later, following the death of David I in May 1153 he was crowned Malcolm IV.  Malcolm gave the Earldom of Northumberland, which he had inherited from their father, to William.

David I (left) with the young Malcolm IV (right) depicted on the charter to Kelso Abbey.

In 1154, King Stephen of England died.  He was succeeded by Henry II, the son of Matilda and first Plantagenet ruler of England, which bought an end to the civil war.  Malcolm IV delayed paying homage to the new king but eventually did so in 1157.  Perhaps as an assertion of the new Kings strength or as retaliation for being snubbed, Henry II refused to allow Malcolm to keep Cumbria or William to remain Earl of Northumberland (remember the Scottish kings had to pay homage to the English sovereign for Cumberland and Northumberland).  It can be assumed that this did not sit too well with the brothers.  Unfortunately, Malcolm IV was chronically ill and did not live long enough to contest this loss of territory.  He died in December 1165 at the age of 24.

Seal of William the Lion

William, who was next in line to the throne, was crowned on Christmas Eve 1165.  He initially spent some time at the court of Henry II, perhaps looking to win him over and reverse the decision on his territorial claims in the north.  It did not work and in 1168, behind Henry II’s back, William secured the first treaty between Scotland and England’s enemy France, a prelude to the Auld Alliance.  This led directly to the revolt against Henry II in 1173 – 74.  Hostilities began in April 1173, when the Counts of Flanders and Boulogne invaded Normandy.  In England, the Earls of Leicester and Norfolk joined in, raising an army of Flemish mercenaries and invaded England.  William’s part was to launch a fresh invasion from Scotland in northern England.  He must have seen this as his opportunity to take back Cumberland and Northumberland by force.

He first moved on Newcastle, but, finding the defences too strong moved to lay siege to Prudhoe Castle, to the west along the Tyne valley.  Similarly, he found Prudhoe to be too strong and he made his way back to Scotland, maybe to rethink his strategy.  He would return the following year to try again.

The following is taken from my trusty, 1939 copy, of Borderland Castles and Peles by Robert Hugill.  It gives us a lively summary of the history of Prudhoe Castle and the events following William’s invasion.    

Prudhoe Castle – “Old England: A Pictorial Museum” (1845) by C. Knight

The name, Prudhoe, meaning the high or proudly swelling mound, conveys an apt impression of this famous stronghold of the Umfravilles.  Though ruined, it still looks down from its eminence a hundred and fifty feet above the broad River Tyne.

The first Umfraville in England was Robin with the Beard, William the Conqueror’s right-hand knight who, for his stout services, was given the barony of Redesdale to defend, with the aid of the very sword worn by William himself, against wolves and the King’s enemies.  Later the huge barony of Prudhoe was added to the Umfraville possessions, and in Henry I’s reign (1100 – 1135) the castle was begun.  Odinel de Umfraville, the builder, had excited the hatred of William the Lion of Scotland by refusing to acknowledge his hereditary claims to the county of Northumberland; and when that monarch invaded England, one of his express objectives was Prudhoe.  “May I be loathed and disgraced, cursed and excommunicated by a priest” he swore, “if I grant any terms or respite to Odinel’s castle!”.  The siege failed (in 1173), but William came back the next year, and Odinel, fearing defeat this time, rode himself day and night on his good bay mare to get reinforcements from the Archbishop of York.  Though the Scots in their anger spoiled the gardens and cornfields outside the castle walls, and barked the orchard apple trees, the besieged did not suffer “a silver pennyworth of harm.”

Following the lack of success at Prudhoe, William divided his forces.  The Earl of Fife went on to attack Warkworth, burning the church of St. Lawrence killing a large number of civilians who had sought refuge inside.  William moved north to besiege Alnwick Castle.  He established a camp nearby but unwisely allowed his army to spread out to pillage and plunder the countryside. 

Alnwick Castle – The Monthly Chronicle of North Country Lore and Legend

On the night of 11th July, Ranulf de Glanville, who was Sheriff of Westmorland, rode north from Newcastle with around four hundred mounted English knights.  The disgruntled Odinel de Umfraville joined them, understandable angry about the state his garden!  Although the small band got themselves lost in fog they managed to reach Alnwick by dawn.  They found the camp almost empty with William protected by only around sixty men of his personal guard.  The English knights charged.  Caught entirely by surprise the Scots did not put up much of a fight.  Williams horse was killed beneath him and he was captured.  Hugil states that…

By an ironical turn of fate, one of the knights who assisted in his capture was Odinel de Umfraville.  How the Lion must have roared!

William was bought back to Newcastle as a captive and his army, leaderless, made their way back to Scotland.  William was eventually moved to Falais in Normandy and an English army marched north to occupy the castles of Roxburgh, Berwick, Jedburgh, Edinburgh and Sterling. 

To obtain his freedom, Henry II forced William to sign the Treaty of Falais, where he swore an oath of allegiance to the English king and agreed to pay for English troops to garrison the Scottish castles which had been taken.  To add insult to injury, William was attacked by an angry mob in Newcastle as he made his way back home.  By this time there was no love lost for Scottish invaders in the North.  The Treaty of Falais lasted for fifteen years, until the new English king, Richard I (the Lionheart), sold the castles back to William to help fund his Crusade to the Holy Land.

William’s part in the Rebellion of 1173 – 74 would be the last time a Scottish king would attempt to regain the lost territories of Cumberland and Northumberland.  Under the Treaty of York in 1237 William’s son, Alexander II, agreed to abandon their claims and the border between England and Scotland was fixed to its current position.

Finally, in case you were wondering, William the Lion, as he would be known to history (he did not go by this epithet during his lifetime), was so called not for his martial prowess but for the fact that his banner was a red lion on a yellow background.  It would be this banner that would go on to be adopted as the Royal Banner of Scotland, still used today.   

Royal Banner of Scotland

The Battle of Alnwick, 1093 & Rebellion of 1095

In my last blog we looked at the Battle of Carham in 1018 and the victory of the Scots over the Saxon Northumbrians. This resulted in the loss of Lothian to the Kingdom of Scotland (the territory between the Rivers Forth and Tweed).  The intervening seventy-five years between 1018 and the Battle of Alnwick in 1093 constituted some of the most rapid and tumultuous change ever experienced in our history.   I think it is important, albeit concisely, to summarise this transition before we discuss the subject of this blog.  I have focussed primarily on the events which took place in or that affected the north of England.

The realisation of Alfred the Great’s dream of a united, Saxon, England was first achieved in 927 in the reign of Alfred’s grandson Æthelstan (927–939).  However, Saxon hegemony was short lived, and in 1016 the fledgling kingdom was conquered by Danish invaders.  Cnut the Great and his successors ruled England along with Denmark and Norway as a powerful North Sea Empire until it came to an abrupt end in 1042 when Cnut the Great’s son Harthacnut died.  He was succeeded by his half-brother Edward.  Edward’s father was Æthelred the Unready (who ruled England until 1016) and his mother was Emma of Normandy, who married Cnut the Great after the death of Æthelred (yes, she married the man who invaded her husband’s kingdom).  Known to history as “the Confessor” owing to his piety, Edward was a Christian Saxon of the House of Wessex.  It looked as though Alfred’s vision would finally be fulfilled.  Alas, it was not to last. 

Across the English Channel, the Dukes of Normandy had established a powerful dynasty in north western France.  They were, however, vassals of the French Crown, following King Charles III granting the Duchy to a Viking named Rollo in 911.  By 1035 the Dukedom had passed to William II known as “the Bastard”.  Edward the Confessor had close links to Normandy through his mother (her father was Duke Richard the Fearless) and he spent a lot of time there throughout his life.  It may have been that Edward, who was childless, had discussed naming Duke William as his successor to the English crown when he visited England in 1051.  Following Edward’s death in January 1066 it seems the succession was far from clear.  William considered himself the rightful heir to the English throne but when the Witan gathered to choose who the next King of England should be, they chose the powerful English Earl, Harold Godwinson.  Harold was from a prominent Anglo Saxon family and he was crowned King of England at Westminster Abbey soon after Edward’s death.  Upon hearing of this news, it can be presumed that William was not impressed, and he began to draw up his plans to invade England, take the throne by force of arms and earn his more noble soubriquet “The Conqueror”.

William was not the only one with designs on taking the crown by force.  Across the North Sea, Harald Hardrada, King of Norway, was invited by Harold Godwinson’s troublesome brother Tostig to invade England and take the throne.  Tostig was the Earl of Northumbria and as a result of his poor governance and general misbehaviour had been exiled by his brother.  Bent on revenge, he joined forces with Hardrada.  Shortly after landing in Yorkshire, the invading army was hastily met by King Harold and defeated at the Battle of Stamford Bridge, just outside York, on 25th September 1066.  Both Hardrada and Tostig were killed in the battle.  Not long after this victory Harold heard that the Normans were preparing to invade the southern shore of his kingdom.  Force marching his army south, Harold met William three weeks later at the Battle of Hastings on 14th October 1066.  It is safe to assume most readers will know the outcome of that particular battle.  William’s victory ended Saxon kingship and England was to be under Norman rule.

The Norman conquest of England amounted to a huge and rapid shift in power and William and his army brutally put down any resistance to the new regime.  Unlike the Viking invaders of two centuries earlier, the Normans did not want to settle their conquered lands.  England was seen by many Normans as a land to be exploited for the benefit of their continental possessions.  As such they wanted to subjugate the population but not replace them.  This allowed Danish and Saxon culture to survive although under the strict Norman yoke. 

To make up for their deficiency in numbers in a hostile land, the Normans imported the idea of castle building as a means of amplifying and projecting their power.  The Saxons had used fortified towns or burghs for defence, but nothing like this.  Norman castles were as offensive as they were defensive and were sited in strategically important places meant to dominate their conquered land.  Initially wooden structures, following the motte and bailey style, they were quickly rebuilt in stone.  They served as fortified homes for the local Norman lords as well as housing garrisons of loyal soldiers ready to sally forth to enforce their will.  It was the beginning of the feudal system in England.  In the North East, castles built in the early Norman (pre 1100) period include: Barnard Castle (1097), Newcastle (1080), Alnwick Castle (1096) and Durham Castle (1072).

William wanted men he trusted to maintain order and enforce his will.  He did this by granting large tracts of land to his Norman nobility.  Interestingly there is evidence of William showing clemency towards the pre-conquest aristocracy.  Edgar Ætheling, the last male of the House of Wessex, was named King by the Saxon Witan following the death of Harold in 1066, but he was never crowned.  Although uprisings in his name occurred regularly in the early years of Williams reign, the matter was ultimately resolved peacefully.

One example of where a native Saxon noble was executed by William was Waltheof, Earl of Northumbria.  Waltheof was the great grandson of Uhtred the Bold (no less) and was a troublesome subject for William.  He was too young to inherit the Earldom when his father, Siward, died in 1055 and this was the reason why Harold Godwinson’s brother Tostig had taken the position.  Following the Battle of Hastings Waltheof submitted to William but involved himself in a failed Danish invasion in 1070.  He was pardoned by William, allowed to marry the King’s niece and was made Earl of Northampton and Northumbria in 1072.  Following William’s instruction, it was Waltheof who began the construction of Durham Castle in 1072.  Despite all this, in 1075 Waltheof once again was embroiled in a rebellion of which he was one of the ring leaders.  This was the last straw for William and in 1076 he was executed.  He was replaced as Earl of Northumbria by the Norman William Walcher, the first Prince Bishop of Durham, who had been appointed in that role by William the Conqueror himself in 1071.

The King of Scotland at the time of the Norman conquest was Malcolm III, known as Canmore (Gaelic for “Great Chief”), who had reigned since 1058.  Malcolm acknowledged his new southern neighbour and, in the words of the Anglo Saxon Chronicle “became his man” (referring to Malcolm recognising William’s overlordship).  Malcolm even handed over his eldest son to William as a hostage and guarantee of his loyalty.  He was, however, a shrewd character and he had no intention of passing up the chance to expand his territory if an opportunity presented itself.  Unsurprisingly, peace between England and Scotland did not last and it was not long before Malcolm was raiding Northumbria. 

In 1079 Malcolm was allowed to pillage and plunder Northumbria for three weeks without opposition.  The man who should have resisted him was William Walcher.  As Prince Bishop, Walcher (who was also Earl of Northumbria by this time) enjoyed almost regal power in his territory.  Walcher was a Norman but he had a Saxon named Ligulf of Lumley, who was from an established Northumbrian family, as one of his councillors.  It may have been that Walcher decided not resist Malcom’s incursion or that he was incapable of organising resistance.  Whatever the reason it angered Ligulf and he was vocal in his criticism of the Bishop.  Two of Walcher’s men took matters into their own hands and they attacked Ligulf’s hall in the middle of the night, killing him and most of his household.  This caused uproar among the local Northumbrians and there was a real threat of rebellion.  To try and calm matters, Walcher agreed to meet with Ligulf’s kinsmen in Gateshead, bringing with him a substantial body of men for protection.  The Northumbrians presented Walcher with a list of the grievences which Walcher summarily dismissed.  Enraged, the Northumbrians attacked.  Walcher and his men fled to a nearby church, which was set on fire by the Northumbrians.  Escaping the flames, Walcher was captured and hacked to death by the mob. 

To deal with the Scots William sent his eldest son, Robert Curthose, north with an army to raid Lothian and Malcolm once more bent the knee and agreed to keep the peace.  It was probably at this time that Robert instructed the building of the castle at a strategic crossing point on the River Tyne called Monkchester.  After the new castle was built, Monkchester would imaginatively be renamed Newcastle upon Tyne. 

Artistic reconstruction of the Norman Castle at Newcastle upon Tyne by Judith Dobie – http://www.newcastlecastle.co.uk

To deal with the constant insurrection of his northern subjects, William’s response was brutal – in what became known collectively as the “Harrying of the North”. William had already waged a savage series of campaigns from the winter of 1069 and throughout the early 1070’s in Yorkshire.  Following his outrage at the death of his man Walcher, it was begun again with renewed vigour and he sent his bellicose half-brother Bishop Odo of Bayeux to lay waste to the lands between the Rivers Tees and Tweed.  His scorched earth tactics were implemented on a huge scale across the northern counties of England in what is now Northumberland, Durham, Yorkshire, Lancashire and Cumbria.  The destruction of land and property alongside the wholesale murder and displacement of people amounted to a genocide of the local Saxon and Danish population.  William did not just want to put down rebellion, he wanted to be sure that it could never happen again.  Records from Williams post conquest survey of his kingdom, the Domesday Book, show that around 75% of the population in the northern counties may have died or never returned.  It would take centuries for the north to recover, with some scholars postulating that the effects were not truly undone until the Industrial Revolution of the nineteenth century.  Writing around fifty years after William’s death, the monk and chronicler Orderic Vitalis, had this to say:

“The King stopped at nothing to hunt his enemies. He cut down many people and destroyed homes and land. Nowhere else had he shown such cruelty. This made a real change. To his shame, William made no effort to control his fury, punishing the innocent with the guilty. He ordered that crops and herds, tools and food be burned to ashes. More than 100,000 people perished of starvation.
I have often praised William in this book, but I can say nothing good about this brutal slaughter. God will punish him.”

When William the Conqueror died in September 1087, he specified that his eldest son, Robert Curthose, should succeed him as Duke of Normandy, but not as King of England.  The Conqueror declared that his second surviving son, also named William (nicknamed Rufus, possibly due to a ruddy complexion), should be crowned as King William II of England.  Suffice to say that this did not sit well with Robert, who thought that that England was rightfully his to rule.  This caused a problem for those nobles who held lands in both Normandy and England as there was no clarity on who their leader truly was, and some decided to side with Robert.  Soon after he was crowned in 1088, a group of barons began a rebellion against William II with the goal of putting Robert on the throne.  To the north Malcolm III was biding his time and wisely decided not to intervene during the ensuing conflict.

One of the nobles who joined the rebellion was Geoffrey de Montbray, Bishop of Coutances.  He had accompanied the Conqueror in 1066, fighting alongside him at Hastings.  Geoffrey’s nephew, Robert de Mowbray (Mowbray was the anglicised version of Montbray), joined with his uncle.  The family name derives from Montbrai in Manche, Normandy. 

Whilst I am sure you found the above incredibly interesting, you may be wondering what all this has to do with the subject of this blog.  Well, it is important to set the scene and introduce Robert de Mowbray, as he is the pivotal figure of our story.

Robert de Mowbray had been appointed as Earl of Northumbria in 1086 and was the constable of Bamburgh Castle.  By all accounts, Robert was not a particularly likeable person. Orderic Vitalis tells us that he was “Powerful, rich, bold, fierce in war, haughty, he despised his equals and, swollen with vanity, disdained to obey his superiors. He was of great stature, strong, swarthy and hairy. Daring and crafty, stern and grim, he was given more to meditation than speech, and in conversation scarce ever smiled”. When the rebellion in 1088 ultimately failed, Robert was magnanimously pardoned by Rufus, who allowed him to retain his lands and title.

The Battle of Alnwick, 1093

At this time the border between the two Kingdoms was not fixed and the Scots’ regularly sought to exploit historical territorial claims in Northumbria and Cumbria.  Following over a decade of peace, Malcolm III sensed weakness following the Harrying of North and the conflict between William Rufus and Robert Curthose.  His ability to attack Cumbria was thwarted by the bolstering of English defences in the region and the construction of Carlisle Castle.  This in itself probably enraged Malcolm due to its proximity to his lands.  In response Malcolm invaded Northumbria, besieging Durham and Newcastle upon Tyne in 1091.  Malcolm’s incursion was enough to draw William II back from Normandy where he had been fighting his brother, Robert.  The English army chased the Scots back over the border and a short -lived truce was agreed.  However, following a meeting between the two kings in Gloucester in 1092, talks broke down and Malcolm returned to Scotland to prepare for war.

In November 1093 Malcolm once more invaded Northumbria and proceeded to besiege Alnwick.  As Earl of Northumbria it fell to Robert de Mowbray to organise the English response.  He did not have enough troops to engage the Scottish in open battle, so he prepared an ambush with a small number of his knights.  Malcolm had his army disbursed around Alnwick, which left him exposed.  He had encamped around ¾ of a mile to the north of Alnwick and on 13th November (St. Brice’s Day) the small English force managed to bypass the main Scottish army and attacked Malcolm’s personal guard. The ensuing attack caught Malcolm completely by surprise and both he and his son were killed.  Malcolm’s Cross, near Alnwick, is said to mark the spot where he fell.  The present cross was erected in 1774 by Elizabeth Percy, Duchess of Northumberland.  It sits next to the base of an older medieval cross which has long since disappeared.  On its western face the new cross bears the inscription “MALCOLM III KING OF SCOTLAND BESIEGEING ALNWICK CASTLE WAS SLAIN HERE NOV. XIII AN MXCIII”.  On its eastern face it carries “MALCOLM’S CROSS DECAYED BY TIME RESTORED BY HIS DESCENDANT ELIZ. DUCHESS OF NORTHUMBERLAND MDCCLXXIV”.  It is an interesting point to note that the inscription on the cross suggests that Malcom besieged Alnwick Castle.  All the sources I can find point to the castle being first built in 1096.  If so, it is presumed that Malcolm may well have besieged the town and disrupted the early construction of it.  Leaderless, the Scottish army disbanded and a succession crisis for the Scottish crown ensued.

Malcolm’s Cross, Alnwick
1888 – 1913 OS Map Showing the Location of Battle
View to the south from Malcolm’s Cross towards Alnwick Castle
The cross erected in 1774
The base of the older medieval cross
OS route of a walk around the battlefield

Rebellion, 1095

Before the Battle of Alnwick in 1093 Robert’s uncle Geoffrey had died and he inherited his uncle’s estates making him one of the most powerful nobles in England.  In 1095 Robert expanded his power further when he married Matilda, who was the niece of Hugh d’Avranches, the first Earl of Chester. 

It perhaps reinforces Orderic Vitalis’ summation of Robert’s character that in 1095 he once again betrayed his King and joined a rebellion with the goal of usurping the throne in favour of a man named Stephen, Count of Aumale.  Stephen was a cousin of William Rufus and Robert Curthose.  The rebellion was lukewarm and most of the baronial support evaporated leaving Robert and his co-conspirator William of Eu exposed.  Matters came to a head when Robert confiscated a number of Norwegian vessels which were lying at anchor in the River Tyne.  Following complaints made to William Rufus by the Norwegian merchants, Robert was summoned by the King.  He refused to attend, and Rufus mustered an army to march north and confront him.  Mowbray retreated to his stronghold of Bamburgh Castle.  Rufus laid siege to the castle.  The fortress at Bamburgh had a reputation for its strength and taking it by force was no easy task.  William invested heavily in the attack and even built a temporary siege castle alongside the fortress calling it “Malvoisin” (Bad Neighbour).  At some point during the siege, Robert managed to escape and fled south leaving his wife Matilda to continue to resist.  He was pursued to Tynemouth, where, after being wounded in the leg, he was captured by the King’s men.  Robert was bought back to Bamburgh in chains.  Matilda still continued to hold out, only ending the siege when Rufus threatened to blind her husband. 

Following his capture, Robert had his lands and title forfeited and he was taken to Windsor Castle as a prisoner.  He remained incarcerated for many years “growing old without offspring” according to the chronicler Florence of Worcester.  He would eventually become a monk at St. Albans Abbey and died around 1125.  Whilst this may seem like an ignoble end it could have been worse.  When William of Eu was captured, he was castrated and blinded and other conspirators were put to death. 

Robert’s wife, Matilda, was granted a divorce from Robert on the grounds of consanguinity (claiming they were too closely related).  She went on to marry Nigel d’Aubigny.  Nigel divorced her in 1118 and went on to marry Gundred de Gournay, having a son with her, Roger, who inherited Robert’s lands.  Roger was told by the new King of England, Henry I to adopt the name Mowbray (even though he was no blood relation to Robert), founding the House of Mowbray.  Famous as Dukes of Norfolk the Mowbray family would go on to play an important role in British history.  Roger himself was a famous knight who died in the Holy Land during the Second Crusade at the Battle of Hattin.

The Battle of Carham – 1018

Carram (Carham) shown on Saxton’s 16th Century County Map of Northumberland

Every so often there is a pivotal event in history, a watershed moment, which has wide reaching cultural and socio-economic impact.  Normally, these events are widely known, almost to the point of cliché; Bosworth, Trafalgar, Waterloo, 1066 and all that.  It can be argued that the Battle of Carham was one of those events.  The battle was fought between the Kingdom of Scotland (Alba) and their allies against the Northumbrians (English).  Before the battle, the Anglo Saxon Kingdom of Northumbria extended from the River Tees to the River Forth (the southern part of the Kingdom of Northumbria, from the Tees to the Humber was under Danish control at this time).  After the Scottish victory, Lothian, the area between the River Forth and the River Tweed was annexed.  This shifted the border between the Kingdom of Scotland and Anglo Saxon England south, to roughly the line of the River Tweed.  It resulted in a huge expansion of Scottish territory and humbled the once mighty Kingdom of Northumbria.  The Scots held on to this new territory and, a couple of hundred years later, Alexander II signed the Treaty of York with Henry III of England, which officially defined the Scottish / English border which exists today.  But, without the victory of Scots at Carham, that border would probably look very different.  

The battle itself is shrouded in mystery.  The Dark Ages is so called because of the scarcity of surviving written evidence.  The Battle of Carham is definitely a casualty of this “darkness” and there are few primary sources to rely on.  Of those that survive, most were written over one hundred years after the events they describe.  Few agree on important matters such as the date of the battle, who the leaders were and exactly where it took place.  Most scholars, who have focussed their studies on the battle, are true detectives, piecing together the fragments to build a picture of what might have happened. 

The sources which historians can draw upon are few enough in number and content that they can be reproduced in full within this blog.  I have replicated the Latin and English translations of the following accounts of the battle, drawing heavily on the work of Neil McGuigan in his article The Battle of Carham: An Introduction, which is part of the wider collection of essays presented in the book: The Battle of Carham – a Thousand Years On (2018).

Roger of Howdens Chronica

Roger of Howden was a chronicler writing in the 12th Century.  He began to compile his Chronica, a general history of England from 732 to his own time, in around 1192.

The original Latin reference to the battle is simply:

Ingenus bellum inter Anglos et Scottos apud Carrum geritur

The English translation:

A massive battle between the English and the Scots is waged at Carham

Historia Regum

The Historia Regum is one of the most important surviving collections of sources for the history of the north of England in the 12th Century.  The copy, known as Manuscript 139, was bequeathed to Corpus Christi College, Cambridge, by Matthew Parker in 1575.  It is attributed to Symeon of Durham and was written before the end of the 12th Century.  It was continued by John of Hexham and further added to with the History of Richard of Hexham.

The original Latin text relating to the Battle of Carham is as follows:

Igens bellum apud Carrum gestum est inter Scottos et Anglos, inter Huctredum filium Waldef comiten Northymbrorum et Malcolmum filium Cyneth regem Scottorum.  Cum quo fuit in bello Eugenius Calvus rex Clutinensium.

The English translation:

A massive battle was fought at Carham between the Scots and English, between Uhtred son of Waltheof earl of the Northumbrians and Mael Coluim son of Cinaed King of the Scots, with whom in battle was Owain the Bald king of the Clyde Folk.

Symeon of Durham’s Libellus de Exordio

The Libellus de exordio atque procursu istius, hoc est Dunhelmensis, ecclesie or Tract on the Origins and Progress of this the Church of Durham is, like elements of the Historia Regum, traditionally attributed to Symeon of Durham.  It was compiled in the early 12th Century and it documents the history of the Bishopric and Church of Durham and its predecessors at Lindisfarne and Chester-le-Street.  It is sometimes referred to as the Historia Dunelmensis ecclesiae.

The original Latin text relating to the Battle of Carham is as follows:

Anno Incarnationis Dominice mille duodeuicesimo, Cnut regnum, Anglorum disponente, Northanhymbrorum populis per triginta noctes cometa apparuit, que terribili presagio futuram prouincie cladem pre-monstrauit. Siquiden Paulo post (id est post triginta dies) uniuersus a flumine Tesa usque Twedam populus, dum contra infinitam Scottorum multitudinem apud Carrum dimicaret, pene totus cum natu maioribus suis interiit.  Episcopus audita populi sancti Cuthberti miseranda nece, alto cordis dolore attacus grauiter ingermuit, et ‘O me’, inquit, ‘miserum! Ut quid in hec tempora seruatus sum?’

The English translation:

In the year of our Lord 1018, while Cnut was ruling the Kingdom of the English, there appeared to the Northumbrian peoples a comet, which persisted for thirty nights, presaging in a terrible way the future devastation of the province.  For soon afterwards (that is after thirty days) the whole people between the river Tees and the river Tweed fought a battle at Carham against a countless multitude of Scots and almost all perished, including even their old folk.  When the bishop heard of the miserable death of the people of St. Cuthbert, he was stricken with deep sorrow of heart and sighed, saying “O why – wretched as I am – was I spared to see these times?”.

Annales Lindisfarnenses et Denelmenses

Another text attributed, in part to our friend Symeon of Durham was again written in the 12th Century.  It covers the period 532 – 1199 AD.

The original Latin text relating to the Battle of Carham is as follows:

Cometa late spargens flammas visa est per Northymbrian per XXX noctes. Transactis post hoc XXX diebus fuit Carrum illud famosum bellum inter Northanhymbros et Scottos, ubi pene totus sancti Cuthberti populus interiit, inter quos etiam XVIII sacerdotes, qui inconsulte se intermiscuerant bello; quo audito prescriptus episcopus dolorem et vitam morte finivit.

The English translation:

A comet spewing flames was seen across Northumbria for thirty nights.  When it passed after thirty days, the infamous battle of Carham was fought between the Northumbrians and Scots, where the entire populus of St Cuthbert met with the penalty of destruction, among them eighteen priests who had rashly got themselves involved in the fray; when he heard the news, the bishop, having ordered his affairs, ended his sadness and his life with death.

Dating the Battle

The Battle of Carham nicely follows my last blog on the Sieges of Durham in 1006 and 1040, as it sits in the middle of those events and involves many of the same historical figures…or does it.  You’ll have no doubt picked up on the fact that mention of Uhtred (The Bold) as the commander of the Northumbrian forces only occurs in one of the source texts discussed above (Historia Regum).  Uhtred had faced King Malcom II of Scotland previously at Durham in 1006.  On that occasion Uhtred defeated the Scots and put them to flight.

If you read my last blog (https://northeastlore.com/2020/11/30/the-siege-of-durham-1006/), Uhtred’s presence at the Battle of Carham in 1018 may strike you as problematic, given that he was killed after submitting to Cnut the Great in 1016.  As my title suggests, the modern scholarly consensus on the date of the battle seems to be hedged towards 1018.  This is on the basis that, of those sources which give a date, the only date given is 1018. 

Another fascinating piece of evidence, which has been used to corroborate the date of 1018, is the reference to the portentous astronomical event preceding the battle, described as a comet.  This is mentioned in both Libellus de Exordio and the Annales Lindisfarnenses et Denelmenses.  What is interesting, is that there is documentary evidence from other contemporary sources of a comet being seen in the night sky during the summer of 1018.  Multiple medieval accounts of the Battle of Vlaardingen, fought between the German Emperor and the Bishop of Utrecht against Count Dirk III of Holland, mention a comet in the same year.  There are also accounts as far away as China which record a comet during August 1018, with a tail 30 cubits long!  In a genius move, Clive Hallam-Baker, who is the Head of Research for the Carham 1018 Society (http://www.carham1018.org.uk/), contacted NASA, who provided him with examples of some of this documentary evidence.

Uhtred or No Uhtred?

So, if the Battle of Carham was fought in 1018 and Uhtred died in 1016, who else could have been in command of the Northumbrians?  The most logical choice is Uhtred’s brother, Eadwulf.  He was named as Uhtred’s successor in the Anglo-Norman era list of Northumbrian Earls.  Another source adds credibility to this argument.  In De Obsessione Dunelmi it is stated that Eadwulf, not Uhtred, was forced to give up Lothian to the Scots, which we know was a direct consequence of the battle.  It is interesting though that the same source, which covers the same time-period, does not mention the Battle of Carham at all.  Eadwulf was known as “Cudal” meaning cuttlefish or cowardly…could this have been an epithet given to him following his defeat?  Symeon of Durham describes him as “a very lazy and cowardly man”.  He died in the early 1020’s and was succeeded by Uhtred’s son Ealdred.

If we look at it from another angle and assume that the date of the battle was earlier, to allow Uhtred to not be dead, it perhaps adds to the reasons why Uhtred felt that there was no other course than to submit to Cnut (see my last blog for the full story).  Following defeat at Carham, Uhtred would have been significantly weakened without the means to resist Cnut invading Northumbria.  It is an interesting thought but, short of new historical sources coming to light, it is likely that we will never know for certain the date or if Uhtred fought in the battle or not.

The Location of Battle

The Battle of Carham Society has done some excellent work on researching potential battle sites.  Local memory had it that the battle was fought on the south side of the River Tweed, just to the east of Wark.  The earlier editions of Ordnance Survey mapping similarly put the location of the battle to the east of Wark (the date is sometimes 1018 and sometimes 1016). 

Site of the Battle on the 1888 – 1913 OS Map – Shown to the east of Wark

However, following the work done by members of the Society and archaeologists (Passmore and Waddington in their work, Managing Archaeological Landscapes in Northumberland) the site of the battle is now thought be further west, to the north of the settlement of Carham itself, on the banks of the River Tweed.  There are several lines of evidence to support this.  Carham was, at the time, an important ecclesiastical centre.  The settlement lies on the line of the Roman road linking Tweedmouth to Dere Street and it is likely that there was river crossing over the Tweed between Carham and Birgham (on 16th Century map by Saxton Birgham is called Long Bridgham).  All signs that this area was a cross roads and likely invasion route.  To the south of Carham is an area called Wallace Croft in relation to its use by William Wallace as an encampment for his invading army in 1296 (OS Six Inch, 1888 – 1913).  There is a weir or ford crossing the River Tweed, at the end of an ancient path which leads from Brigham Church, which could suggest the location of the former crossing.  Crossings can still be made at low water levels during the summer.  Interestingly, again on old OS mapping, a point on the river adjacent to this area is referred to as Bloody Breeks. Descriptive names such as this are commonly associated with battlefields (Bloody Meadow at Towton for instance).

1888 – 1913 OS Map with annotations

Interestingly on the older OS maps there is also reference to a battle fought in 833AD just to the south of Carham, in a place called Dunstan Wood.  John Leland (16th Century poet and antiquary) tells us that in the 33rd year of Ecbright (probably referring to King Ecgberht of Wessex 802 – 839) the Danes arrived at Lindisfarne and fought with the English at Carham where Eleven Bishops and two English Countes were slayne, and a great numbre of people.  Human bones have been known to arise from time to time in this area.

The Battle Itself

Unfortunately, no written account of the battle survives and all that can be made is an educated guess as to the number of combatants and their dispositions.  Despite the exaggeration of chroniclers of the time in relation to other battles, it is likely that the numbers engaged were not great, perhaps even counted in the hundreds.  The total population of England in 1066 has been estimated to be somewhere in the region of 2 – 2.5 million.  To put this into context, the current population of London is somewhere around 8.98 million.  It was no mean feat to muster a sizeable army in 1018.

The Battle of Carham, as a historical event, is worthy of wider acclaim.  I’ll be honest, for some reason, I’ve always avoided learning about this period in history but having read the wider context to prepare for these blogs I find it utterly fascinating.  Saxon Britain was a changeable political minefield, where fortunes ebbed and flowed like the tide that Cnut the Great tried to tame.

The Sieges of Durham – 1006 and 1040

The Siege of Durham – 1006

Foundations

It all starts with St. Cuthbert.  Cuthbert, as he was simply known before his posthumous canonisation, was born in around 634 in Dunbar, which was in the very north of the Anglo Saxon Kingdom of Northumbria.  He lived a holy life travelling and preaching as a monk and hermit known as the “Wonder Worker of Britain”.  He retired in 676 with the intention of living out his days in quiet contemplation off the wind swept Northumbrian Coast. 

In 684 he was elected to be Bishop of Hexham, much to his dismay.  He finally agreed to become a Bishop but only if he could do a swap with Eata, Bishop of Lindisfarne, so he could stay put.  He didn’t last long in the role and died in 687.  After his death numerous miracles were attributed to him and he was revered as a saint.  Apparently, when it was inspected 11 years after his death, his body remined fully intact with no signs of decay.  More notable for national acclaim was when Alfred the Great, King of Wessex, had a vision of St. Cuthbert in a dream which inspired and encouraged him in his struggle against the Danes.  This was perhaps later embellished as a metaphor for the unification of Saxon England with Alfred in the south and Cuthbert representing the north.  He would go on to become the most important medieval saint of Northern England and his “cult” would attract pilgrims from all over Christendom. 

He was buried on Lindisfarne in a decorated oak coffin but, in 875, following repeated Viking raids, the monks of Lindisfarne fled carrying the venerated St. Cuthbert’s remains with them.  The monks initially settled in Chester le Street.  In 994 King Æthelread II the Unready (meaning “poor council”) of England paid a Danegeld (protection money) to King Sweyne I (Forkbeard) of Denmark and King Olaf I of Norway in return for peace.  Aldhun, who was Bishop of Lindisfarne (in exile), decided that it was now safe for the monks to move back to Cuthbert’s original resting place.   However, legend has it that a monk, named Eadmer had a vision in which he was told by St. Cuthbert that his coffin should be taken to a place called Dun Holm.  Unfortunately, poor Eadmer had no idea where Dun Holm might be.  As luck would have it, the monks came across two local milk maids who were searching for their dun coloured cow.  They decided to follow them thinking that this was probably a sign from their cryptic saint.  Eventually, they found themselves on a wooded peninsular formed by a loop in the River Wear.  Apparently at this spot St. Cuthbert’s coffin stuck fast and could not be moved.  Satisfied that this was indeed divine providence, they decided to stay. 

A settlement had likely existed in the area since around 2000BC but the foundation of Dun Holm or Durham is associated with the arrival of St. Cuthbert.  Initially, a very simple wooden structure was erected to house the remains of St. Cuthbert in the spot where Durham Cathedral stands today.  A more permanent timber structure was then built, called the White Church, which was in turn rebuilt in stone between 998 and 1018.  The foundation of Durham is generally accepted as the date of the consecration of the White Church (which was to become Durham Cathedral) in 998.  Aldhun became the first Bishop of Durham.

At this time Northumbria was still divided.  Northern Northumbria was under Saxon influence with its base of power in Bamburgh.  Southern Northumbria, south of the River Tees was still very much under the influence of the Danes with their seat of power in York. This roughly followed the areas of the former Kingdoms of Bernicia (in the north) and Deira (in the south).

It’s important to start with the above as it highlights just how soon after its foundation that the inhabitants of Durham found themselves under attack.  Not by Vikings this time but by our neighbours to the north and perhaps a taste of things to come. 

Durham benefits from occupying a position with strong natural defences and may well have been chosen for this reason rather than a hard to manoeuvre coffin.  The loop of the River Wear surrounds the peninsular on three sides so an approach by land, without having to cross the river, is only possible from the north.  Coupled with this is that Durham occupies a prominent position on high ground with steep, wooded slopes going down to the river which would be difficult to negotiate for an attacking army.  It is likely that the settlement was fortified with a simple wooden palisade.

Uhtred the Bold

One man who was present at the time of Durham’s foundation was Uhtred, known to history as “the Bold”.  He was from an ancient Bernician family who ruled from the fortress of Bamburgh on Northumbrian coast.  He helped to clear the site of the new Cathedral and married Ecgfrida, the daughter of Bishop Aldhun.  If this is all sounding a bit familiar it is not surprising.  Bernard Cornwell took the historical figure of Uhtred the Bold as his inspiration for his leading character, Uhtred of Bebbenburg, in his Saxon Stories.  Played by Alexander Dreymon in the Netflix series The Last Kingdom, he is depicted as a complex character, born a Saxon but raised by Danes.  They are great stories and I love the series but there has definitely been a bit of artistic licence taken with the character, his deeds and historical timing.  Nevertheless, we should not let the truth get in the way of a good story!  As it happens, apparently Bernard Cornwell got the inspiration to write the Saxon Stories after learning he was a descendent of Uhtred the Bold!

We digress, back to the historical Uhtred and the Siege of Durham.

The Siege – 1006

The main historical source for this and subsequent events are De Obsessione Dunelmi (“On the Siege of Durham”) which was written in the late 11th or early 12th centuries (possibly in Fountains Abbey, possibly in Hexham, possibly in Sawley – it’s still up for debate).

In 1006, Malcom II of Scotland invaded Northumbria.  Malcom was born in around 954 and was crowned King of Scotland in 1005, ruling until his death in 1034.  It is thought that the invasion of Northumbria was an example of the rech rig (translated as “royal prey”), a customary raid by a new king to demonstrate his capabilities in war.

Malcom headed for the newly founded settlement of Durham and laid it under siege.  At the time, the Danes were raiding southern England and King Æthelred was unable to assist the Northumbrians.  Uhtred’s father, the elderly Ealdorman of Northumbria, Waltheof, was too old to fight and remained in his fortress of Bamburgh.  Similarly, Ealdorman Ælfhelm of York was also unable or unwilling to assist.  Uhtred took it on himself to raise an army of Northumbrians and Yorkshiremen.  We do not know the details of the ensuing battle to relieve the siege, but it resulted in the complete defeat of the invading Scottish army.  It is said that local women were paid the sum of one cow to wash the heads of the Scottish dead before they were displayed on spikes along the walls of Durham.  Malcom would be back, however.

Uhtred and England After the Siege

Following the victory Uhtred was rewarded by King Æthelred by being made Ealdorman of Bamburgh (even though his father was still alive!).  Æthelred then had Ealdorman Ælfhelm of York murdered allowing Uhtred to succeed to that position too which united northern and southern Northumbria under his governance.  This was a political move by Æthelred to bind Northumbria together under Saxon hegemony.

Following his rise to prominence Uhtred dismissed his wife Ecgfrida and married Sige who was the daughter of a man named Styr, a wealthy Danish citizen of York.  This seems to have been a political marriage, again to stabilise and unify Northumbria.  It came with a price though and a condition of the marriage was that Uhtred had to kill a man named Thurband the Hold, who was an enemy of Styr.  Thurband was a Danish nobleman.  His title “the Hold” denoted him as a land holder and was a somewhere in rank between a thegn and ealdorman in prominence.  His name is perhaps given to the region of Holderness on the North Yorkshire coast which he owned.  Seemingly Uhtred was unable to make good on assassinating Thurband with disastrous consequences as we shall see.   

In 1013, King Sweyne Forkbeard of Denmark, invaded England, forcing King Æthelred to flee to exile in Normandy.  Forkbeard was crowned King of England at Christmas 1013.  Probably seeing that there was no other option, Uhtred submitted to him.  Forkbeard did not last long however, and five weeks later he was dead.  This allowed Æthelred to return and resume his reign, and Uhtred submitted to him once more.  Perhaps as a reward or perhaps as a means of ensuring his loyalty Æthelred gave Uhtred his daughter, Ælfgifu’s hand in marriage.

Uhtred’s End

In 1016 England was invaded once more, by Forkbeards son Cnut with the help of his ally Eadric Streona, Ealdorman of Mercia.   Uhtred seemed to have served his King loyally and he went on campaign with Æthelred’s son Edmund Ironside to try and repel the invaders.  While he was away from his lands Cnut and his army invaded Northumbria and over the next few months, he conquered most of the rest of the England. To make matters worse Æthelred died in April 1016.  His son Edmund Ironside was declared King by the citizens of London, who were under siege by the Danes.  However, the Witan (the council who “elected” Anglo Saxon Kings), perhaps under some coercion, chose Cnut as king.

Around this time, Uhtred may have faced Malcom II of Scotland for a second time at the Battle of Carham.  The date for the battle and even the presence of Uhtred is contentious.  The date given for the battle by Symeon of Durham is 1018 but this is problematic, as we shall see following the events which are likely to have occurred in 1016.  We will go into more detail on the Battle of Carham in the next blog. 

The battle resulted in defeat for Uhtred and the Northumbrians and, in response to Cnut occupying Northumbria, he saw no other option than to submit.  He was invited to meet with Cnut who welcomed him to his hall.  After he was received by Cnut, Uhtred and forty of his men were ambushed by Thurband the Hold (the man Uhtred was meant to kill as a condition of his marriage to Sige).  Taken completely by surprise, and perhaps with the assistance of Uhtred’s own servant, Uhtred was murdered.  It is most probable that the order for Uhtred’s death came directly from Cnut to allow him to install a Dane and a man he trusted as Ealdorman of Northumbria,  Eiríkr Hákonarson,. 

De Obsessione Dunelmi describes Uhtred’s death as follows:

After King Æthelred’s death, when Cnut had laid hands upon the whole kingdom of England, he sent to the earl ordering him to come to him as his new lord. He did so, having accepted safe conduct for his journey and return. On the appointed day, he entered the king’s presence at Wiheal to discuss terms of peace; through the treachery of a powerful king’s thegn, Thurbrand, known as “Hold”, the king’s soldiers who had hidden behind a curtain spread across the width of the hall, suddenly sprang out in mail and slaughtered the earl and forty of his chief men who had entered with him.

The killing initiated a bloodfeud between Thurband’s family and the descendants of Uhtred that lasted for generations.  Uhtred’s eldest son Ealdred avenged his father and killed Thurband in around 1024.  Ealdred was then killed by Thurband’s son Carl and two of Carl’s sons were in turn killed by Ealdred’s grandson Earl Waltheof.  The book, Bloodfeud: Murder and Revenge in Anglo-Saxon England, by Richard Fletcher is well worth a read.

Saxons Defeated

Edmund Ironside, in a last ditch effort to defeat Cnut, raised an army in the south.  Following several inconclusive engagements Edmund was decisively defeated at the Battle of Assandun in October 1016.  Edmund died of wounds or was murdered, soon after in November.  This left the throne open to Cnut, known to history as Cnut the Great, who reigned in England until his death in 1035.  He would go on to become King of Denmark (1018) and Norway (1028) creating a North Sea empire.  He is perhaps most commonly remembered today as the king who thought he could command the tide.

The Second Siege – 1040

After his death in 1035, Cnut was succeeded by his son Harold Harefoot, who had a difficult reign before dying in 1040. He was never really legitimately King and his younger half brother Harthacnute had a stronger claim. When Harold died in 1040 his half brother had his body exhumed, beheaded and thrown in a fen. It was a different time.

Anyway, back north and the successor to Malcom II was spoiling for a fight. This was Duncan I, nicknamed An t-llgarach (the “diseased”) and was the historical bases for “King Duncan” in Shakespeare’s play Macbeth.

Following the blood feud murder of Ealdred of Bamburgh in 1038 (by Carl, son of Thurband) Duncan sensed weakness in Northumbria and in 1039, he led a large Scottish army south. Ealdred was succeed as Ealdorman of Bamburgh by Uhtred’s other son Eadwulf. Remembering the disaster of the Battle of Carham the Northumbrians decided to retreat to their strongholds and not meet Duncan’s army in the field. Eadwulf took refuge in Durham and in 1040 Duncan laid siege to the City. Details of the siege are scarce but it clear that the Scots were defeated and Eadwulf ravaged Scottish lands in retaliation.

Eadwulf did not have long to bask in the glory of his victory and a year later, in 1041, he was betrayed and murdered by the new King Harthacnute.

The Battle of Corbridge, 918

#TheLastKingdom

Overview

Fans of the Bernard Cornwell Saxon Series of books and the popular Netflix adaptation “The Last Kingdom” will be well aware of the historical setting of the Battle of Corbridge.  It occurred around eight years after the Battle of Tettenhall (August 910) which was covered in the book “The Pagan Lord” and episode four of Season Four of The Last Kingdom. 

As with most events during this period, the records are scant and there is some debate on the exact date and location of the battle, the numbers involved and even if it was only one battle or two separate engagements.  What is known, based on references given in the Annals of Ulster and the Chronicle of the Kings of Alba, is that a battle was fought between the Norse-Gael leader Ragnall ua Ímair and his allies against the forces of Constantine II, King of Alba (Scotland) and Ealdred I of Bamburgh. 

The description given in the Annals of Ulster suggests that the Norse-Gael army was divided into four columns.  The combined Scottish army managed to defeat the first three columns but was ambushed by the fourth.  It seems that, following some fierce fighting, the Scottish army managed to disengage in some order and the outcome was indecisive.

However, following the battle, the Vikings did not march north into Scotland and Ragnall was able to exploit the weakness of Northumbria and establish himself as de facto ruler of southern Northumbria, taking the City of York in 919 and proclaiming himself King.

The Battle Site

It is unknown exactly where the battle took place other than it was on the banks of the River Tyne around the area of Corbridge.

The British Isles in the 10th Century

Map showing England in the late 9th and early 10th Centuries

At the time of the Battle of Corbridge the British Isles was a splintered mosaic of separate Kingdoms.  Modern notions of England, Scotland, Wales and Ireland did not yet exist (although soon would).  The Germanic Angles, Saxons and Jutes had settled in the British Isles between the 5th and 7th Centuries, following the decline of the Roman Empire, displacing native Celtic tribes and pushing them to the fringes of Cornwall, Wales, West Scotland, Ireland and the many islands along the west coast.  By the 9th Century, Anglo Saxon England (the collective name for the various Germanic settlers of the British Isles) was formed of several Kingdoms: Wessex in the Southwest, Kent, Sussex and Essex in the Southeast, East Anglia, Mercia from the Thames to the Midlands and Northumbria occupying the lands north of the River Humber up to the River Forth in Scotland.  In the 8th Century, Norse warriors known collectively as the Vikings began raiding the coast and rivers of the British Isles.  In the North East, raids on Lindisfarne and Jarrow are particularly well known.  This was followed by a concerted effort to settle in these newly won lands and they quickly carved out the lands known as “Dane Law”.  This separated and truncated the Anglo Saxon Kingdoms severely and effectively cut off and isolated Northumbria in the North.  Northumbria was further weakened under Viking and Scottish attacks and almost ceased to exist.  The Norse invaders were pagan, worshiping the panoply of Norse Gods.  The Christian Saxons feared and reviled them and took it upon themselves to rid the land of these heathens in a holy war.  It was a difficult task.  The Vikings were ruthless fighters and the Saxons, being fragmented, struggled to coordinate their efforts.  Alfred the Great (849 – 899) began the fight back and his son Edward the Elder and grandson Athelstan finally succeeded in neutralising the Viking threat and united the Anglo Saxon Kingdoms to form the fledgling Kingdom of England (Angle Land) in 924.  Saxon hegemony would not last long and in 142 years (in 1066) descendants of other Norse “Vikings”, the Normans, would succeed in invading England.

Who were the Norse-Gaels?

Often included under the blanket term “Vikings” (which can be misleading), the Norse-Gaels were a people of mixed Gaelic and Norse ancestry and culture who were descended from Vikings who settled in Ireland and Scotland.  Eventually the Viking roots would become ever more diluted, but they left a lasting influence on place names, especially in the Isle of Man and Outer Hebrides.  Norse-Gaelic surnames, such as MacIvor, MacAskill and MacCotter are vestiges of the Norse influence.

Map showing the heartlands of the Norse-Gaels

The Norse-Gaels dominated much of the Irish Sea, Scottish coastal regions and islands from the 9th to the 12th Centuries.  They founded the Kingdom of the Isles, the Kingdom of Dublin, The Lordship of Galloway (which is named after them) and briefly they ruled the Kingdom of York. 

The Ui Ímair (“the grandsons of Ímair” or Ivor the Boneless) were one of the greatest dynasties of the Viking age.  For a time, at their height, they were the most fearsome and wide-reaching power in the British Isles.

Ragnall ua Ímair (died 921) was a grandson of Ímair (Ivor) and probably grew up in Dublin.  He was likely expelled from Dublin in around 902 following attacks by the Kings of Leinster and Brega, which drove the Vikings out.  He is thought to have then moved to southern Scotland or the Isle of Mann before following his kinsman Sitric Cáech to attack and retake Dublin in 917.  Ragnall then left for England with aspirations to become King in Northumbria.  This led him to the Battle of Corbridge following which he did indeed proclaim himself King in York.  His rule was immediately challenged by a group of Christian Vikings who opposed his paganism.  Ragnall died in 921 and was succeeded by his kinsman Sitric Cáech.

What was the Kingdom of Alba?

The Kingdom of Alba refers to the Kingdom of Scotland between the deaths of Donald II in 900 and Alexander III in 1286.  The collapse of the Kingdom led directly to the Scottish Wars of Independence.  Constantine II (c900 – 943), who fought at the Battle of Corbridge, was the second king to be recognised as King of Alba.

Map showing the Kingdom of Alba

The Importance of Bamburgh

Bamburgh, known as Bebbanburg (named after the Saxon Queen Bebba) was an important settlement (perhaps the capital) of both the Kingdom of Bernicia and then the Kingdom of Northumbria (following the merging of Bernicia with Deira in the 7th Century).  Before the idea of “England” became a reality, the Saxon kingdoms of Wessex, Mercia and Northumbria were not united.  Following the defeat of Northumbrian forces by the Viking Great Heathen Army, at York in 867, the Kingdom of Northumbria was reduced to a rump state with most of their southern lands lost.  Bamburgh remained as a lonely outpost of Anglo Saxon Christianity surrounded by the Danes to the South and the Scottish Kingdoms to the West and North.  A fortress has existed on the site of Bamburgh Castle since Celtic times and, due to its elevated position and exploitation of natural defences, was all but impregnable before the age of gun powder. 

Who was Ealred of Bamburgh?  Following the deaths of Danes Eowils and Halfdan at the Battle of Tattenhall (910), Ealdred may have become ruler of what was left of Saxon Northumbria.  The Historia de Sancto Cuthberto states that Ealdred “was a friend of King Edward the Elder, as his father had been a favourite of Edwards father King Alfred the Great.”  Ealdred was driven from his lands by Ragnall ua Ímair sometime between 914 and 918.  He sought refuge at the court of Constantine II King of Scotland (Alba).  Following this he joined Constantine II to fight Ragnall at the Battle of Corbridge.  As the battle was inconclusive, Ealdred did not regain his former lands and in 927 he was one of the northern rulers to submit King Athelstan (Edward the Elders son).  He largely disappears from the sources after this and he is thought to have died sometime around 933.

Warfare in 10th Century Britain

Whilst we can’t know how the actual battle of Corbridge was fought, we can speculate. Battle in 10th Century Britain was a brutal and close quartered affair.  Most soldiers were not professionals but generally knew how to fight.  The shield wall was the most common battlefield tactic of the time, in which the two forces would form lines of locked shields before closing with the enemy to use short thrusting swords, axes and spears.  The two sides would slog it out pushing and shoving in unison until one side gave ground and broke the line.  Once a battle line was broken the army could easily be routed.

The fantasy depictions of this era, with warriors clad in studded, close fitting (and overly flattering) leather armour bedecked with a mass of fur around the shoulders is, alas, a myth (thanks Game of Thrones). As is the pointy helmet!

Shield Wall – The Last Kingdom

North East Victoria Cross Winners

This is a list of 25 soldiers and sailors from the north east who have received the highest award for bravery.  They are very interesting group of men who have showed supreme courage on the field of battle.  The list includes those who fought during the Indian Mutiny of 1857, the Defence of Rorke’s Drift during the Anglo-Zulu War, World War 1 and World War 2.  It’s worth clicking on the links to find out a bit more about them.  Information sources include Wikipedia, London Gazette Archive and VCOnline.

Richard Wallace Annand (1914 – 2004)

Place of birth: South Shields, Tyne and Wear

Unit:  Durham Light Infantry

Rank (at time of VC action): 2nd Lieutenant

Conflict:  World War 2

Citation

For most conspicuous gallantry on the 15th–16th May 1940, when the platoon under his command was on the south side of the River Dyle, astride a blown bridge. During the night a strong attack was beaten off, but about 11 a.m. the enemy again launched a violent attack and pushed forward a bridging party into the sunken bottom of the river. Second Lieutenant Annand attacked this party, but when ammunition ran out he went forward himself over open ground, with total disregard for enemy mortar and machine-gun fire. Reaching the top of the bridge, he drove out the party below, inflicting over twenty casualties with hand grenades. Having been wounded he rejoined his platoon, had his wound dressed, and then carried on in command.

Richard Annand’s platoon sergeant said later “Mr Annand came to me at platoon headquarters and asked for a box of grenades as they could hear Jerry trying to repair the bridge. Off he went and he sure must have given them a lovely time because it wasn’t a great while before he was back for more.

During the evening another attack was launched and again Second Lieutenant Annand went forward with hand grenades and inflicted heavy casualties on the enemy. When the order to withdraw was received, he withdrew his platoon, but learning on the way back that his batman was wounded and had been left behind, he returned at once to the former position and brought him back in a wheelbarrow, before losing consciousness as the result of wounds.

Find Out More

http://www.vconline.org.uk/richard-wallace-annand-vc/4585926096


William Wilson Allen (1843 – 1896)

Place of birth:  Kyloe, Northumberland

Unit: 24th Regiment of Foot

Rank (at time of VC action): Corporal

Conflict:  Anglo-Zulu War

Citation

On the night of 22nd-23rd January 1879 under the command of Lieutenants Chard of the Royal Engineers, and Bromhead of the 24th, Corporal Allen and another man, Private Frederick Hitch were heavily involved in keeping communication open between the hospital and the barricades. During this action, Allen was wounded in the left shoulder, and briefly left the front line to get treatment. Their actions had already helped the patients to be withdrawn from the hospital safely, and having had their wounds dressed, they returned to action. Unable to bear arms due to his wounds, Allen joined with Hitch in distributing ammunition boxes around to their comrades throughout the night.

Allen was recommended for the Victoria Cross and his citation alongside Hitch was published in the London Gazette on 2nd May 1879. He was presented with his medal later that year on 9th December by Queen Victoria at Windsor Castle. Later he served as a Sergeant Instructor with the 3rd Militia Battalion in Brecon and the 4th Volunteer Battalion in Monmouth.

Find Out More

http://www.vconline.org.uk/william-wilson-allen-vc/4585912685


Roland Boys Bradford (1892 – 1917)

Place of birth:  Witton Park, County Durham

Unit:  Durham Light Infantry

Rank (at time of VC action):  Lieutenant Colonel

Conflict:  World War 1

Citation

For most conspicuous bravery and good leadership in attack, whereby he saved the situation on the right flank of his Brigade and of the Division. Lieutenant-Colonel Bradford’s Battalion was in support. A leading Battalion having suffered very severe casualties, and the Commander wounded, its flank became dangerously exposed at close quarters to the enemy. Raked by machine-gun fire, the situation of the Battalion was critical. At the request of the wounded Commander, Lieutenant-Colonel Bradford asked permission to command the exposed Battalion in addition to his own. Permission granted, he at once proceeded to the foremost lines. By his fearless energy under fire of all description, and his skilful leadership of the two Battalions, regardless of all danger, he succeeded in rallying the attack, captured and defended the objective, and so secured the flank.

Find Out More

http://www.vconline.org.uk/roland-b-bradford-vc/4585990673


George Nicholson Bradford (1887 – 1918)

Place of birth:  Witton Park, County Durham

Unit:  Royal Navy

Rank (at time of VC action):  Lieutenant Commander

Conflict:  Work War 1

Citation

For most conspicuous gallantry at Zeebrugge on the night of the 22nd–23rd April, 1918. This Officer was in command of the Naval Storming Parties embarked in Iris II. When Iris II proceeded alongside the Mole great difficulty was experienced in placing the parapet anchors owing to the motion of the ship. An attempt was made to land by the scaling ladders before the ship was secured. Lieutenant Claude E. K. Hawkings (late Erin) managed to get one ladder in position and actually reached the parapet, the ladder being crushed to pieces just as he stepped off it. This very gallant young officer was last seen defending himself with his revolver. He was killed on the parapet. Though securing the ship was not part of his duties, Lieut.-Commander Bradford climbed up the derrick, which carried a large parapet anchor and was rigged out over the port side; during this climb the ship was surging up and down and the derrick crashing on the Mole. Waiting his opportunity he jumped with the parapet anchor on to the Mole and placed it in position. Immediately after hooking on the parapet anchor Lieut.-Commander Bradford was riddled with bullets from machine guns and fell into the sea between the Mole and the ship. Attempts to recover his body failed. Lieut.-Commander Bradford’s action was one of absolute self-sacrifice; without a moment’s hesitation he went to certain death, recognising that in such action lay the only possible chance of securing Iris II and enabling her storming parties to land.

Find Out More

http://www.vconline.org.uk/george-n-bradford-vc/4585990490


Hugh Cairns (1896 – 1918)

Place of birth:  Ashington, Northumberland

Unit:  46th Battalion, CEF

Rank (at time of VC action):  Sergeant

Conflict:  World War 1

Citation

For most conspicuous bravery before Valenciennes on 1st November, 1918, when a machine gun opened on his platoon. Without a moment’s hesitation Serjt. Hugh Cairns seized a Lewis gun and single-handed, in the face of direct fire, rushed the post, killed the crew of five, and captured the gun. Later, when the line was held up by machine-gun fire, he again rushed forward, killing 12 enemies and capturing 18 and two guns.

Subsequently, when the advance was held up by machine guns and field guns, although wounded, he led a small party to outflank them, killing many, forcing about 50 to surrender, and capturing all the guns. After consolidation, he went with a battle patrol to exploit Marly and forced 60 enemies to surrender. Whilst disarming this party he was severely wounded. Nevertheless, he opened fire and inflicted heavy losses. Finally, he was rushed by about 20 enemies and collapsed from weakness and loss of blood.

Throughout the operation, he showed the highest degree of valour, and his leadership greatly contributed to the success of the attack. He died on the 2nd November from wounds.

Find Out More

http://www.vconline.org.uk/hugh-cairns-vc/4586139444


Edward Colquhoun Charlton (1920 – 1945)

Place of birth:  Rowlands Gill, Gateshead

Unit:  Irish Guards

Rank (at time of VC action):  Guardsman
Conflict:  World War 2

Citation

In Germany on the morning of 21st April, 1945, Guardsman Charlton was co-driver in one tank of a troop which, with a platoon of infantry, seized the village of Wistedt. Shortly afterwards, the enemy attacked this position under cover of an artillery concentration and in great strength, comprising, as it later transpired, a battalion of the 15 Panzer Grenadiers supported by six self-propelled guns. All the tanks, including Guardsman Charlton’s, were hit; the infantry were hard pressed and in danger of being over-run.

Whereupon, entirely on his own initiative, Guardsman Charlton decided to counterattack the enemy. Quickly recovering the Browning from his damaged tank, he advanced up the road in full view of the enemy, firing the Browning from his hip. Such was the boldness of his attack and the intensity of his fire that he halted the leading enemy company, inflicting heavy casualties on them. This effort at the same time brought much needed relief to our own infantry.

For ten minutes Guardsman Charlton fired in this manner, until wounded in the left arm. Immediately, despite intense enemy fire, ‘he mounted his machine gun on a nearby fence, which he used to support his wounded left arm. He stood firing thus for a further ten minutes until he was again hit in the left arm which fell away shattered and useless.

Although twice wounded and suffering from Boss of blood, Guardsman Charlton again lifted his machine gun on to the fence, now having only one arm with which to fire and reload. Nevertheless, he still continued to inflict casualties on the enemy, until finally;” he was hit for the third time and collapsed. He died later of his wounds in enemy hands. The heroism and determination of this Guardsman in his self-imposed task were beyond all praise. Even his German captors were amazed at his valour.

Guardsman Charlton’s courageous and self-sacrificing action not only inflicted extremely heavy casualties on the enemy and retrieved his comrades from a desperate situation, but also enabled the position to be speedily recaptured.

Find Out More

http://www.vconline.org.uk/edward-c-charlton-vc/4586173202


George Bell Chicken (1833 – 1860)

Place of birth:  Wallsend, Tyne and Wear

Unit:  Indian Naval Brigade

Rank (at time of VC action):  Master (Civilian Volunteer)

Conflict:  Indian Mutiny

Citation

Indian Naval Brigade. For great gallantry on the 27th September, 1858, at Suhejnee, near Peroo, in having charged into the middle of a considerable number of the rebels, who were preparing to rally and open fire upon the scattered pursuers. They were surrounded on all sides, but, fighting desperately, Mr. Chicken succeeded in killing five before he was cut. down himself. He would have been cut to pieces, had not some of the men of the 1st Bengal Police and 3rd Seikh Irregular Cavalry, dashed into the crowd to his rescue/and routed it, after killing several of the Enemy.

Find Out More

http://www.vconline.org.uk/george-b-chicken-vc/4586181974


Joseph Henry Collin (1893 – 1918)

Place of birth:  Jarrow, Tyne and Wear

Unit:  King’s Own Royal Lancaster Regiment

Rank (at time of VC action):  2nd Lieutenant

Conflict:  World War 1

Citation

For most conspicuous bravery, devotion to duty and self-sacrifice in action. After offering a long and gallant resistance against heavy odds in the Keep held by his platoon, this officer, with only five of his men remaining, slowly withdrew in the face of superior numbers, contesting every inch of the ground. The enemy were pressing him hard with bombs and machine-gun fire from close range. Single-handed 2nd Lt. Collin attacked the machine gun and team. After firing his revolver into the enemy, he seized a Mills grenade and threw it into the hostile team, putting the gun out of action, killing four of the team and wounding two others. Observing a second hostile machine gun firing, he took a Lewis gun, and selecting a high point of vantage on the parapet whence he could engage the gun, he, unaided, kept the enemy at bay until he fell mortally wounded. The heroic self-sacrifice of 2nd Lt. Collin was a magnificent example to all.

Find Out More

http://www.vconline.org.uk/joseph-h-collin-vc/4586220820


Edward Cooper (1896 – 1985)

Place of birth:  Stockton-on-Tees

Unit:  King’s Royal Rifle Corps

Rank (at time of VC action):  Sergeant

Conflict:  World War 1

Citation

For most conspicuous bravery and initiative in attack. Enemy machine guns from a concrete blockhouse, 250 yards away, were holding up the advance of the battalion on his left, and were also causing heavy casualties to his own battalion. Sjt. Cooper, with four men, immediately rushed towards the blockhouse, though heavily fired on. About 100 yards distant he ordered his men to lie down and fire at the blockhouse. Finding this did not silence the machine guns, he immediately rushed forward straight at them and fired his revolver into an opening in the blockhouse. The machine guns ceased firing and the garrison surrendered. Seven machine guns and forty-five prisoners were captured in this blockhouse.

By this magnificent act of courage he undoubtedly saved what might have been a serious check to the whole advance, at the same time saving a great number of lives.

Find Out More

http://www.vconline.org.uk/edward-cooper-vc/4586242424


Fredrick William Dobson (1886 – 1935)

Place of birth:  Ovingham, Northumberland

Unit:  Coldstream Guards

Rank (at time of VC action):  Private

Conflict:  World War 1

Citation

For conspicuous gallantry at Chavanne (Aisne) on the 28th of September, in bringing into cover on two occasions, under heavy fire, wounded men who were lying exposed in the open.

Find Out More

http://www.vconline.org.uk/frederick-w-dobson-vc/4586532870


Dennis Donnini (1925 – 1945)

Place of birth:  Easington Colliery, County Durham

Unit:  Royal Scots Fusiliers

Rank (at time of VC action):  Fusilier

Conflict:  World War 2

Citation

In North-West Europe on 18th January, 1945, a Battalion of the Royal Scots Fusiliers supported by tanks was the leading Battalion in the assault of the German position between the Rivers Roer and Maas. This consisted of a broad belt of minefields and wire on the other side of a stream.

As the result of a thaw the armour was unable to cross the stream and the infantry had to continue the assault without the support of the tanks. Fusilier Donnini’s platoon was ordered to attack a small village.

As they left their trenches the platoon came under concentrated machine gun and rifle fire from the houses and Fusilier Donnini was hit by a bullet in the head. After a few minutes he recovered consciousness, charged down thirty yards of open road and threw a ‘grenade into the nearest window.

The enemy fled through the gardens of four houses, closely pursued by Fusilier Donnini and the survivors of his platoon. Under heavy fire at seventy yards range Fusilier Donnini and two companions crossed an open space and reached the cover of a wooden barn, thirty yards from the enemy trenches.

Fusilier Donnini, still bleeding profusely from his wound, went into the open under intense close range fire and carried one of his companions, who had been wounded, into the barn. Taking a Bren gun he again went into the open, firing as he went.

He was wounded a second time but recovered and went on firing until a third bullet hit a grenade which he was carrying and killed him.

The superb gallantry and self-sacrifice of Fusilier Donnini drew the enemy fire away from his companions on to himself. As the result of this, the platoon were able to capture the position, accounting for thirty Germans and two machine guns.

Throughout this action, fought from beginning to end at point blank range, the dash, determination and magnificent courage of Fusilier Donnini enabled his comrades to overcome an enemy more than twice their own number.

Find Out More

http://www.vconline.org.uk/dennis-donnini-vc/4586533050


Basil John Douglas Guy (1882 – 1956)

Place of birth:  Bishop Auckland

Unit:  Royal Navy

Rank (at time of VC action):  Midshipman (on board HMS Barfleur)

Conflict:  Boxer Rebellion

Citation

On 13th July 1900, during the attack on Tientsin City, a very heavy cross-fire was brought to bear on the Naval Brigade, and there were several casualties. Among those who fell was an able seaman (name not quoted here), shot about 50 yards short of cover. Mr. Guy stopped with him, and, after seeing what the injury was, attempted to lift him up and carry him in, but was not strong enough, so after binding up the wound Mr. Guy ran to get assistance. In the mean time, the remainder of the company had passed in under cover, and the entire fire from the city wall was concentrated on Mr. Guy and the other man. Shortly after Mr. Guy had got in under cover the stretchers came up, and again Mr. Guy dashed out and assisted in placing the wounded man on the stretcher and carrying him in. The wounded man was however shot dead just as he was being carried into safety. During the whole time, a very heavy fire had been brought to bear upon Mr. Guy, and the ground around him was absolutely ploughed up.

Find Out More

http://www.vconline.org.uk/basil-j-d-guy-vc/4586873567


Michael Wilson Heaviside (1880 – 1939)

Place of birth:  Durham

Unit:  Durham Light Infantry

Rank (at time of VC action):  Private

Conflict:  World War 1

Citation

For most conspicuous bravery and devotion to duty.

When the Battalion was holding a block in the line a wounded man was observed about 2 p.m. in a shell hole some sixty yards in advance of our block and about forty yards from the enemy line. He was making signals of distress and holding up an empty water bottle. Owing to snipers and machine gun fire it was impossible, during daylight, to send out a stretcher party. But Pte. Heaviside at once volunteered to carry water and food to the wounded man, despite the enemy fire.

This he succeeded in doing, and found the man to be badly wounded and nearly demented with thirst.

He had lain out for four days and three nights, and the arrival of the water undoubtedly saved his life.

Pte. Heaviside, who is a stretcher bearer, succeeded the same evening, with the assistance of two comrades, in rescuing the wounded man.

Find Out More

http://www.vconline.org.uk/michael-w-heaviside-vc/4586954510


Stanley Elton Hollis (1912 – 1972)

Place of birth:  Middlesbrough

Unit:  Green Howards

Rank (at time of VC action):  Warrant Officer Class II (Company Sergeant Major)

Conflict:  World War 2

Citation

In Normandy on 6 June 1944 Company Sergeant-Major Hollis went with his company commander to investigate two German pill-boxes which had been by-passed as the company moved inland from the beaches. “Hollis instantly rushed straight at the pillbox, firing his Sten gun into the first pill-box, He jumped on top of the pillbox, re-charged his magazine, threw a grenade in through the door and fired his Sten gun into it, killing two Germans and taking the remainder prisoners.

Later the same day… C.S.M. Hollis pushed right forward to engage the [field] gun with a PIAT [anti-tank weapon] from a house at 50 yards range… He later found that two of his men had stayed behind in the house…In full view of, the enemy who were continually firing at him, he went forward alone…distract their attention from the other men. Under cover of his diversion, the two men were able to get back.

Wherever the fighting was heaviest…[he]…appeared, displaying the utmost gallantry… It was largely through his heroism and resource that the Company’s objectives were gained and casualties were not heavier. ….he saved the lives of many of his men.

Find Out More

http://www.vconline.org.uk/stanley-e-hollis-vc/4587029527


James Bulmer Johnson (1889 – 1943)

Place of birth:  Widdrington, Northumberland

Unit:  The Northumberland Fusiliers

Rank (at time of VC action):  2nd Lieutenant

Conflict:  World War 1

Citation

For most conspicuous bravery and devotion to duty S.W. of Wez Macquart on the morning of 14th Oct, 1918, during operations by strong patrols.

He repelled frequent counter-attacks and for six hours under heavy fire he held back the enemy. When at length he was ordered to retire lie was the last to leave the advanced position, carrying a wounded man. Three times subsequently this officer returned and brought in badly wounded men under intense enemy machine-gun fire. His valour, cheerfulness and utter disregard of danger inspired all.

Find Out More

http://www.vconline.org.uk/james-b-johnson-vc/4587207236


Thomas Kenny (1882 – 1948)

Place of birth:  South Wingate, County Durham

Unit:  Durham Light Infantry

Rank (at time of VC action):  Private

Conflict:  World War 1

Citation

For most conspicuous bravery and devotion to duty on the night of 4th November, 1915, near La Houssoie. When on patrol in a thick fog with Lieutenant Brown, 13th Battalion, Durham Light Infantry, some Germans, who were lying out in a ditch in front of their parapet, opened fire and shot Lieutenant Brown through both thighs. Private Kenny, although heavily and repeatedly fired upon, crawled about for more than an hour with his wounded officer on his back, trying to find his way through the fog to our trenches. He refused more than once to go on alone, although told by Lieutenant Brown to do so. At last, when utterly exhausted, he came to a ditch which he recognised, placed Lieutenant Brown in it, and went to look for help. He found an officer and a few men of his battalion at a listening post, and after guiding them back, with their assistance Lieutenant Brown was brought in, although the Germans again opened heavy fire with rifles and machine-guns, and threw bombs at 30 yards distance. Private Kenny’s pluck, endurance and devotion to duty were beyond praise.

Find Out More

http://www.vconline.org.uk/thomas-kenny-vc/4587282599


Edward Lawson (1873 – 1955)

Place of birth:  Newcastle upon Tyne

Unit:  Gordon Highlanders

Rank (at time of VC action):  Private

Conflict:  Tirah Campaign

Citation

The Gordon Highlanders. Private E. Lawson. During the attack on the Dargai Heights on the 20th October, 1897, Private Lawson carried Lieutenant K. Dingwall, the Gordon Highlanders (who was wounded and unable to move), out of a heavy fire, and subsequently returned and brought in Private McMillan, being himself wounded in two places.

Find Out More

http://www.vconline.org.uk/edward-lawson-vc/4587420089


John Aidan Liddell (1888 – 1915)

Place of birth:  Newcastle upon Tyne

Unit:  No.7 Squadron RFC

Rank (at time of VC action):  Captain

Conflict:  World War 1

Citation

For most conspicuous bravery and devotion to duty on 31st July, 1915. When on a flying reconnaissance over Ostend-Bruges-Ghent he was severely wounded (his right thigh being broken), which caused momentary unconsciousness, but by a great effort he recovered partial control after his machine had dropped nearly 3,000 feet, and notwithstanding his collapsed state succeeded, although continually fired at, in completing his course, and brought the aeroplane into our lines— half an hour after he had been wounded.

The difficulties experienced by this Officer in saving his machine, and the life of his observer, cannot be readily expressed, but as the control wheel and throttle control were smashed, and also one of the undercarriage struts, it would seem incredible that he could have accomplished his task.

Find Out More

http://www.vconline.org.uk/john-a-liddell-vc/4587448524


George Allan Maling (1888 – 1929)

Place of Birth:  Bisphopwearmouth (Sunderland), Tyne and Wear

Unit:  Royal Army Medical Corps (Medical Officer in the Prince Consort’s Own Rifle Brigade)

Rank (at time of VC action):  Temporary Lieutenant

Conflict:  World War 1

Citation

For most conspicuous bravery and devotion to duty during the heavy fighting near Fauquissart on 25th September, 1915. Lieutenant Maling worked incessantly with untiring energy from 6.15 a.m. on the 25th till 8 a.m. on the 26th, collecting and treating in the open under heavy shell fire more than 300 men. At about 11 a.m. on the 25th he was flung down and temporarily stunned by the bursting of a large high explosive shell, which wounded his only assistant and killed several of his patients. A second shell soon after covered him and his instruments with debris, but his high courage and zeal never failed him and he continued his gallant work single-handed.

Find Out More

http://www.vconline.org.uk/george-a-maling-vc/4587496416


William McNally (1894 – 1976)

Place of birth:  Murton, County Durham

Unit:  Green Howards

Rank (at time of VC action):  Sergeant

Conflict:  World War 1

Citation

For most conspicuous bravery and skilful leading during the operations on the 27th October, 1918, across the Piave, when hie company was most seriously hindered in its advance by heavy machine-gun fire from the vicinity of some buildings on a flank. Utterly regardless of personal safety, he rushed the machine-gun post single-handed, killing the team and capturing the gun.

Later at Vazzola, on the 29th October, 1918, when his company, having crossed the Monticano River, came under heavy rifle and machine-gun fire, Sjt. McNally immediately directed the fire of his platoon against the danger point, whilst he himself crept to the rear of the enemy position. Realising that a frontal attack would mean heavy losses, he, unaided, rushed the position, killing or putting to flight the garrison and capturing a machine gun.

On the same day, when holding a newly captured ditch, he was strongly counterattacked from both flanks. By his coolness and skill in controlling the fire of his party he frustrated the attack, inflicting heavy casualties on the enemy.

Throughout the whole operations his innumerable acts of gallantry set a high example to his men, and his leading was beyond all praise.

Find Out More

http://www.vconline.org.uk/william-mcnally-vc/4587619996


Robert Newell (1835 – 1858)

Place of birth:  Seaham, County Durham

Unit:  9th Lancers

Rank (at time of VC action):  Private

Conflict:  Indian Mutiny

Citation

For conspicuous gallantry at Lucknow, on the 19th of March, 1858, in going to the assistance of a comrade whose horse had fallen on bad ground, and bringing him away, under a heavy fire of musketry from a large body of the enemy.

Find Out More

http://www.vconline.org.uk/robert-newell-vc/4587726073


Henry Howey Robson (1894 – 1964)

Place of birth:  South Shields, Tyne and Wear

Unit:  Royal Scots

Rank (at time of VC action):  Private

Conflict:  World War 1

Citation

For most conspicuous bravery near Kemmel on the 14th December, 1914, during an attack on the German position, when he left his trench under a very heavy fire and rescued a wounded Non-commissioned Officer, and subsequently for making an attempt to bring another wounded man into cover, whilst exposed to a severe fire: In this attempt he was at once wounded, but persevered in his efforts until rendered helpless by being shot a second time.

Find Out More

http://www.vconline.org.uk/henry-h-robson-vc/4588068486


Richard Been Stannard (1902 – 1977)

Place of birth:  Blyth, Northumberland

Unit:  Royal Navy

Rank (at time of VC action):  Lieutenant (on board HMS Arab)

Conflict:  World War 2

Citation

The KING has been graciously pleased to approve the grant of the Victoria Cross to Lieutenant Richard Been Stannard, R.N.R., H.M.S. Arab, for outstanding valour and signal devotion to duty at Namsos. When enemy bombing attacks had set on fire many tons of hand grenades on Namsos wharf, with no shore water supply available, Lieutenant Stannard ran Arab’s bows against the wharf and held her there. Sending all but two of his crew aft, he then endeavoured for two hours to extinguish the fire with hoses from the forecastle. He persisted in this work till he had to give up the attempt as hopeless.

After helping other ships against air attacks, he placed his own damaged vessel under shelter of a cliff, landed his crew and those of two other trawlers, and established an armed camp. Here those off duty could rest while he attacked enemy aircraft which approached by day, and kept anti-submarine watch during the night.

When another trawler near-by was hit and set on fire by a bomb, he, with two others, boarded Arab and moved her 100 yards before the other vessel blew up. Finally, when leaving the fjord, he was attacked by a German bomber which ordered him to steer East or be sunk. He held on his course, reserved his fire till the enemy was within 800 yards, and then brought the aircraft down.

Throughout a period of five days Arab was subjected to 31 bombing attacks and the camp and Lewis gun positions ashore were repeatedly machine-gunned and bombed; yet the defensive position was so well planned that only one man was wounded.

Lieutenant Stannard ultimately brought his damaged ship back to an English port. His continuous gallantry in the presence of the enemy was magnificent, and his enterprise and resource not only caused losses to the Germans but saved his ship and many lives.

Find Out More

http://www.vconline.org.uk/richard-b-stannard-vc/4588279339


Adam Herbert Wakenshaw (1914 – 1942)

Place of birth:  Newcastle upon Tyne

Unit:  Durham Light Infantry

Rank (at time of VC action):  Private

Conflict:  World War 2

Citation

On the 27th June, 1942, south of Mersa Matruh, Private Wakenshaw was a member of the crew of a 2-pounder anti-tank gun. An enemy tracked vehicle towing a light gun came within short range. The gun crew opened fire and succeeded in immobilising the enemy vehicle. Another mobile gun came into action, killed or seriously wounded the crew manning the 2-pounder, including Private Wakenshaw, and silenced the 2-pounder. Under intense fire, Private Wakenshaw crawled back to his gun. Although his left arm was blown off, he loaded the gun with one arm and fired five more rounds, setting the tractor on fire and damaging the light gun. A direct hit on the ammunition finally killed him and destroyed the gun. This act of conspicuous gallantry prevented the enemy from using their light gun on the infantry Company which was only 200 yards away. It was through the self sacrifice and courageous devotion to duty of this infantry anti-tank gunner that the Company was enabled to withdraw and to embus in safety.

Find Out More

http://www.vconline.org.uk/adam-h-wakenshaw-vc/4588398535


Thomas Young (1895 – 1966)

Place of birth:  Boldon, Tyne and Wear

Unit:  Durham Light Infantry

Rank (at time of VC action):  Private

Conflict:  World War 1

Citation

For most conspicuous bravery in face of the enemy when acting as a stretcher-bearer. He showed throughout the whole course of the operations a most magnificent example of courage and devotion to duty. On nine different occasions he went out in front of our line in broad daylight under heavy rifle, machine gun and shell fire which was directed on him, and brought back wounded to safety, those too badly wounded to be moved before dressing he dressed under this harassing fire, and carried them unaided to our lines and safety; he rescued and saved nine lives in this manner.

His untiring energy, coupled with an absolute disregard of personal danger, and the great skill he showed in dealing with casualties, is beyond all praise. For five days Pte. Young worked unceasingly, evacuating wounded from seemingly impossible places.

Find Out More

http://www.vconline.org.uk/thomas-young-vc/4588593615


Christmas Ideas!

I’ve shared so many beautiful images of our historic Northeast since starting this blog. All of them have been taken from old books I have collected. I liked some of them so much I wanted to make them into prints to have in my home. They came out so well I decided to make some available to buy on my Redbubble site. The feedback I’ve had so far has been great. I don’t make much money from it (putting it mildly!) but I think they make great wall art and wanted to share them. If you fancy having a look and maybe getting one as a Christmas present (!) please do so here……https://www.redbubble.com/people/morton82/portfolio?asc=u